
Website Performance Optimization

Web Performance Is User Experience

Why WordPress Performance Matters
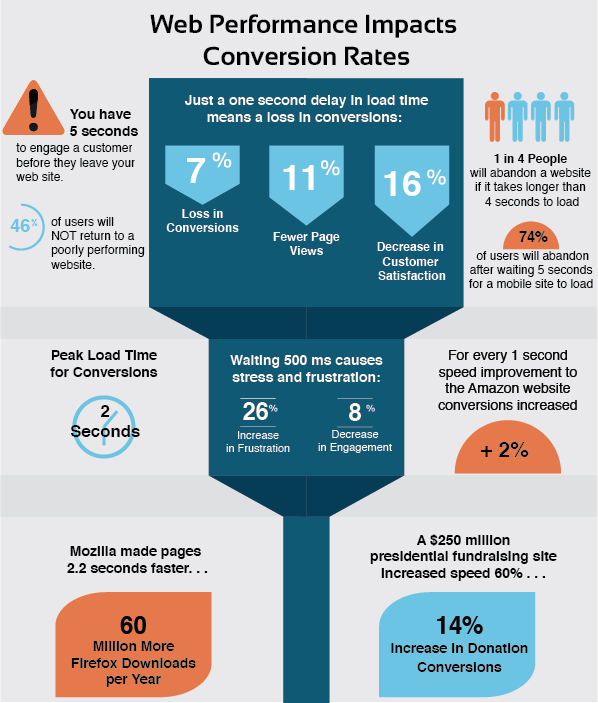
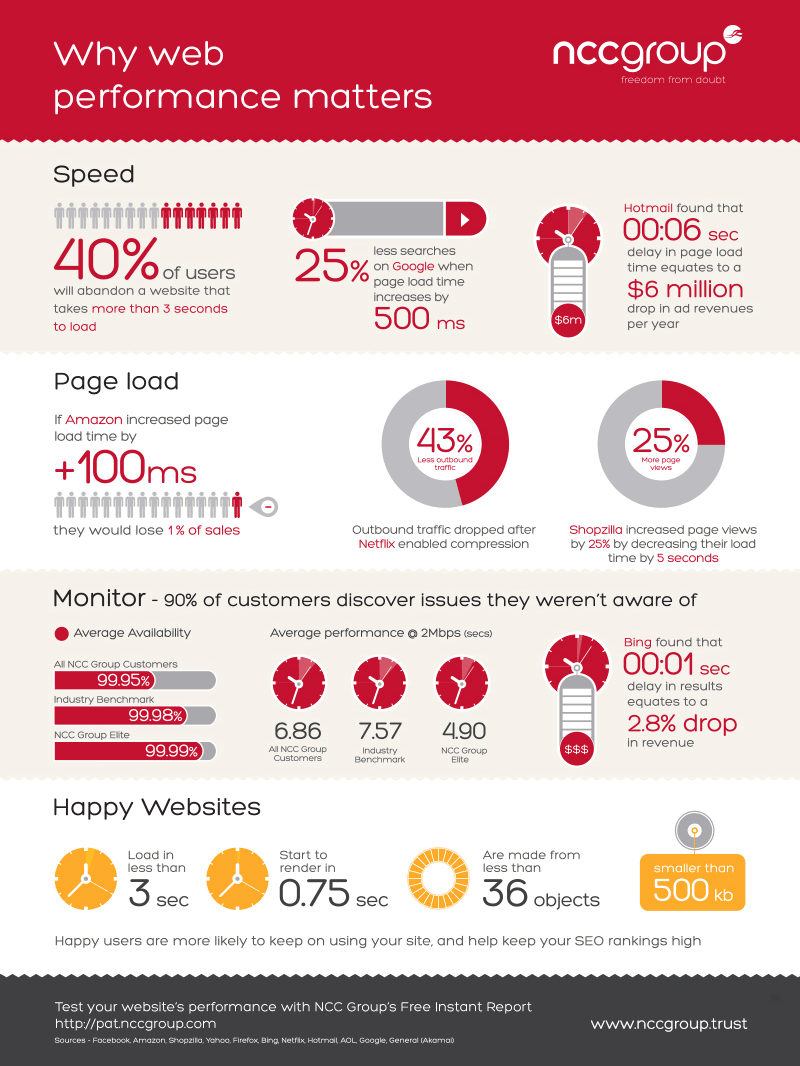
Site performance is extremely important. It affects your SEO, conversions, page views, customer satisfaction, and revenue. This is nothing new since these effects have been proved out since 2012. For example, radware's post on "Mobile Stress" demonstrates that site slowness leads to user frustration and lower engagement directly relating performance to user experience. CresTech published a case study highlighting the need for performant and highly available infrastructure. In January 2018, on the Webmaster Central Blog, Google published that site speed would affect your mobile search ranking beginning in July 2018 with their "Speed Update." According to Think with Google, as your page load time increases, so does your conversion and bounce rate.
The neural net, which had a 90% prediction accuracy, found that as page load time goes from one second to 10 seconds, the probability of a mobile site visitor bouncing increases 123%. Similarly, as the number of elements—text, titles, images—on a page goes from 400 to 6,000, the probability of conversion drops 95%.
In 2016, DoubleClick published that 53% of users abandon sites that take longer than 3 seconds to load. Many web developers forget that the majority of world-wide connections are only 2G. Furthermore, consider these reasons to care about your site's performance (published by GlobalDots):
- Each second delay results in a direct loss in sales (~-7%).
- Increased bounce rate, even abandonment for sites > 6s.
- ~80% of shoppers will never buy again if dissatisfied with site's performance.
- Potential customers will use a competitor's site if their site is faster by a mere 250ms.
- Most mobile users expect the sites to load faster than the desktop site, if not just as fast.
- Faster sites save money in hosting costs.
- Site changes that slow your site down just 400ms affect your SEO and appearance in search results.
In the Performance Series, we will be investigating various components of how to improve your WordPress site's performance including:
- Performance KPIs/Measurements
- Tools for Measuring Performance
- Plugins
- Hosting
- CDN
So stay tuned!
Consider these infographics:


Web Performance Impacts Conversion Rates
- « Previous Page
- 1
- 2
- 3
- 4
- …
- 60
- Next Page »