WP Smith

Creating WordPress & Genesis Websites Since 2010

  • Home
  • About
  • Services
  • Blog
  • Contact

Jan 05 2012

Developing a Custom Post Type and a Custom Taxonomy in Genesis with Custom Pages, Part 4

Now, in Developing a Custom Post Type and a Custom Taxonomy in Genesis with Custom Pages, Part 1, we have the registration of the custom post type, custom taxonomy and the addition of the metaboxes. In Part 2, we discussed the Single Page Template for the custom post type. In Part 3, we discussed the Taxonomy Template for the custom taxonomy. For good measure, let's create a basic page template to wrap this all up. This will create a front page of sorts for the custom taxonomy and the single custom post type pages.

A. File Setup

First, create the file as page-{whatever}.php (WordPress Codex). While you can use page-{slug}.php, this can cause some unexpected issues. So naming it page-{whatever}.php forces the user to assign it via the page templates area. So in our case, it will be page-brakes.php.

B. Template Name

The first thing you must enter with any page template is the Template Name.
[php]<?php
/*
*Template Name: Disc Brakes Template
*/
[/php]

B. Menu Move

Now, for this example, I want to use a menu system. So I will be using the secondary menu system to accomplish this, and I want this to appear below the title.

[php]<?php
// Place the secondary navigation menu below the title
remove_action( 'genesis_after_header', 'genesis_do_subnav' );
add_action( 'genesis_after_post_title', 'genesis_do_subnav' );

// Enable the secondary navigation menu for single post type
add_filter('genesis_options', 'wps_define_genesis_setting' , 10, 2);
function wps_define_genesis_setting( $options, $setting ) {
if( $setting == GENESIS_SETTINGS_FIELD ) {
$options['subnav'] = 1;
}
return $options;
}
[/php]

If you notice, I programmatically turn on the secondary menu. However, again, in Genesis > Theme Settings, site-wide, I have the secondary navigation system turned off. Now, for this page template, I have selectively turned it on.

If you use the secondary navigation for your site, simply register a new navigation system and then add it. See the previous tutorial for this information.

C. Include the Genesis Framework **VERY IMPORTANT

[php]<?php
genesis();
[/php]

So here is our finished product: page-brakes.php
[php]
<?php

/*
*Template Name: Disc Brakes Template
*/

// Place the secondary navigation menu below the title
remove_action( 'genesis_after_header', 'genesis_do_subnav' );
add_action( 'genesis_after_post_title', 'genesis_do_subnav' );

// Enable the secondary navigation menu for single post type
add_filter('genesis_options', 'wps_define_genesis_setting' , 10, 2);
function wps_define_genesis_setting( $options, $setting ) {
if( $setting == GENESIS_SETTINGS_FIELD ) {
$options['subnav'] = 1;
}
return $options;
}

genesis();
[/php]
Written by Travis Smith · Categorized: Custom Post Types, Genesis

Jan 05 2012

How to Effectively Use the Blog Template with the Genesis Easter Egg, query_args

Ok, surprisingly, there is little to nothing written on the fun Easter Egg within the Genesis loop. So with little to no coding knowledge one can easily take advantage of this rarely known secret.

So with this, your possibilities are almost endless. You can do anything rather quickly. So what are the steps:

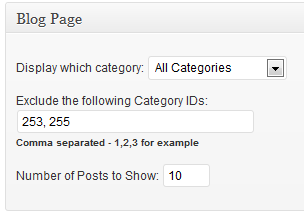
Genesis Theme Settings Blog Page

  1. Create a New Page
  2. Select Blog Template
  3. Add a query_args custom field

Category Pages

First, you can create Category Pages, if and only if you have not removed it from the Theme Settings > Blog Page. So in the image below, I cannot use categories 255 and 253 for my query_args.

query_args Custom Field

Custom Post Type Pages

Second, you can easily create Custom Post Type templates, using this method as well. While you won't be able to set or arrange all the specific fields as you may want or have the customizations like remove_post_info or remove_post_meta, you can quickly create these.

query_args Custom Field

Now many plugins that have custom fields come with shortcodes on entering those custom fields into the body of the test, just as AgentPress even does. However, for those that do not have those shortcodes, you can easily add this to your functions.php to get those custom fields outputted.

***NOTE: The following shortcuts are done on a per post basis. If you do this on the template page, it will not work. It must be done on the posts of the custom post type for each post.

[php]
/**
* Returns the value of a custom field.
*
* Supported shortcode attributes are:
* field (field name),
*
* @author Travis Smith
* @param array $atts Shortcode attributes
* @return string Shortcode output
*/
add_shortcode( 'post_field', 'wps_post_field_shortcode' );

function wps_post_field_shortcode( $atts ) {

$defaults = array(
'field' => '',
);
$atts = shortcode_atts( $defaults, $atts );

return genesis_get_custom_field( $atts['field'] );
}
[/php]

To use this shortcode, simply enter the field id, so that: [post_field field="the-custom-field-id"] and it will appear.

Now, when the page displays the various custom post types content items (or posts), then they will appear in default fashion with post meta, post info, etc. However, one way I easily remove post info or post meta is using a custom field again. However, you need to make sure you have this conditional function in your functions.php file. Something like this:

[php]
// Customize the post meta function
add_filter( 'genesis_post_info', 'wps_post_info_filter' );
function wps_post_info_filter( $post_info ) {
if ( genesis_get_custom_field ( 'wps_no_post_info' ) ) //again, no_post_info can be whatever you name your custom field
$post_info = '';
return $post_info;
}

// Customize the post meta function
add_filter( 'genesis_post_meta', 'post_meta_filter' );
function post_meta_filter( $post_meta ) {
if ( genesis_get_custom_field ( 'wps_no_post_meta' ) ) //again, no_post_info can be whatever you name your custom field
$post_meta = '';
return $post_meta;
}}
[/php]

No Post Info

If you wanted, you could also use the various possible shortcodes available to you and conditionally set your post meta and post info. StudioPress has an excellent Shortcodes Reference Guide.

The functions then would look something like this:

[php]
// Customize the post meta function
add_filter( 'genesis_post_info', 'wps_post_info_filter' );
function wps_post_info_filter( $post_info ) {
if ( genesis_get_custom_field ( 'wps_no_post_info' ) ) //again, no_post_info can be whatever you name your custom field
$post_info = genesis_get_custom_field ( 'wps_post_info' );
return $post_info;
}

// Customize the post meta function
add_filter( 'genesis_post_meta', 'post_meta_filter' );
function post_meta_filter( $post_meta ) {
if ( genesis_get_custom_field ( 'wps_post_meta' ) ) //again, no_post_info can be whatever you name your custom field
$post_meta = genesis_get_custom_field ( 'wps_post_meta' );
return $post_meta;
}
[/php]

Custom Post Info and Post Meta

Written by Travis Smith · Categorized: Genesis

Jan 04 2012

Developing a Custom Post Type and a Custom Taxonomy in Genesis with Custom Pages, Part 3

In the first tutorial, Developing a Custom Post Type and a Custom Taxonomy in Genesis with Custom Pages, Part 1, we covered the following:

  1. Register your Custom Post Type
  2. Register your Custom Taxonomy
  3. Create my Metaboxes
  4. Clear Permalinks

In the previous tutorial Developing a Custom Post Type and a Custom Taxonomy in Genesis with Custom Pages, Part 2, we covered how to Create the Single Page Template for the Custom Post Type.

In this tutorial, we will walk through how to Create a Custom Taxonomy Page Template. Now the specifics will be different from custom taxonomy to custom taxonomy. This is how a taxonomy archives will appear, just like if someone clicks on a specific category or tag (via category.php). However, I will walk you through a basic setup.

A. File Setup

First, create the file as taxonomy-{taxonomy_registered_name}.php (WordPress Codex). So in our case, it will be single-wps_axlesizes.php.

B. Menu Move

Now, for this example, I want to use a menu system. So I will be using the secondary menu system to accomplish this, and I want this to appear below the title. (**This assumes that your site hasn't done anything with Secondary Navigation.)

[php]<?php
// Place the secondary navigation menu below the title
remove_action( 'genesis_after_header', 'genesis_do_subnav' );
add_action( 'genesis_after_post_title', 'genesis_do_subnav' );

// Enable the secondary navigation menu for single post type
add_filter('genesis_options', 'wps_define_genesis_setting' , 10, 2);
function wps_define_genesis_setting( $options, $setting ) {
if( $setting == GENESIS_SETTINGS_FIELD ) {
$options['subnav'] = 1;
}
return $options;
}
[/php]

If you notice, I programmatically turn on the secondary menu. However, in Genesis > Theme Settings, sitewide, I have the secondary navigation system turned off. Now, for this page template, I have selectively turned it on.

If you already use the secondary navigation for your site, simply register a new additional navigation system and then add it. See the previous tutorial for this information.

C. Post Meta/Post Info

Now, I would like to remove the post meta and post info. (**This assumes that your site hasn't done anything with Secondary Navigation.
[php]<?php
// Remove the post info function
remove_action( 'genesis_before_post_content', 'genesis_post_info' );

// Remove the post meta function
remove_action( 'genesis_after_post_content', 'genesis_post_meta' );
[/php]

D. Custom Loop **VERY IMPORTANT

Now, I want to create my custom display of the content via the loop. This section will dramatically change from custom taxonomy to custom taxonomy based on what type of information you'd like to display and how you'd like to display it. This would be where you would introduce the Genesis Grid Loop, if you wanted to go that route. Since this file refers to all the terms in the custom taxonomy, we have to code thinking about them all.

[php]<?php
remove_action('genesis_loop', 'genesis_do_loop');
add_action('genesis_loop', 'wps_do_axlesizes_loop');
function wps_do_axlesizes_loop() {
global $query_args; // any wp_query() args

// Get term
$term = get_query_var( 'term' );

$args = array(
'tax_query' => array(
array(
'taxonomy' => 'wps_axlesizes',
'field' => 'slug',
'terms' => $term
)
)
);

genesis_custom_loop( wp_parse_args( $query_args , $args ) );
}[/php]

E. Custom Content **VERY IMPORTANT

Finally, I want to create my custom display of the content via the content. Again, this section will dramatically change from custom taxonomy to custom taxonomy based on what type of information you'd like to display and how you'd like to display it.

[php]<?php
remove_action('genesis_post_content', 'genesis_do_post_content');
add_action('genesis_post_content', 'wps_do_axlesizes_content');
function wps_do_axlesizes_content() {
global $post;

$size = 'thumbnail'; // Change this to whatever add_image_size you want
$default_attr = array(
'class' => "alignleft attachment-$size",
'alt' => $post->post_title,
'title' => $post->post_title,
);

// check if the post has a Post Thumbnail assigned to it.
if ( has_post_thumbnail() ) {
printf( '<a href="%s" title="%s">%s</a>', get_permalink(), the_title_attribute( 'echo=0' ), genesis_get_image( array( 'size' => $size, 'attr' => $default_attr ) ) );
}

the_content( __( '[Read more...]' , 'genesis' ) );

printf( '<a href="%s" title="%s">%s</a>', get_permalink(), the_title_attribute( 'echo=0' ), __( 'click for specifications' ) );

echo '<div class="clear"></div>';
}[/php]

Now, for SEO purposes, we wanted to include the page name that will be associated with

tags.
// Add a page title (optional). This can be hard coded to pull the title from a specific page, but it is easier just to enter the page name here.
[php]<?php
add_action( 'genesis_before_content' , 'wps_page_title' , 10 );
function wps_page_title() {
?>
<h1>Disc Brake Kits</h1>
<?php
}
[/php]

F. Include the Genesis Framework **VERY IMPORTANT

[php]<?php
genesis();
[/php]

The next step would be to style the taxonomy archive accordingly and as needed, which I am not going to cover here.

So our finished product is this: single-wps_axlesizes.php
[php]
<?php
/**
* Taxonomy Template: wps_axlesizes
*
* This file is responsible for the display of
* taxonomy archives for wps_axlesizes custom taxonomy.
*
* @author Travis Smith <[email protected]>
* @copyright Copyright (c) 2011, Travis Smith
* @license http://opensource.org/licenses/gpl-2.0.php GNU Public License
*
*/

// Place the secondary navigation menu below the title
remove_action( 'genesis_after_header', 'genesis_do_subnav' );
add_action( 'genesis_after_post_title', 'genesis_do_subnav' );

// Enable the secondary navigation menu for single post type
add_filter('genesis_options', 'wps_define_genesis_setting' , 10, 2);
function wps_define_genesis_setting( $options, $setting ) {
if( $setting == GENESIS_SETTINGS_FIELD ) {
$options['subnav'] = 1;
}
return $options;
}

// Remove the post info function
remove_action( 'genesis_before_post_content', 'genesis_post_info' );

// Remove the post meta function
remove_action( 'genesis_after_post_content', 'genesis_post_meta' );

remove_action('genesis_loop', 'genesis_do_loop');
add_action('genesis_loop', 'wps_do_axlesizes_loop');
function wps_do_axlesizes_loop() {
global $query_args; // any wp_query() args

// Get term
$term = get_query_var( 'term' );

$args = array(
'tax_query' => array(
array(
'taxonomy' => 'wps_axlesizes',
'field' => 'slug',
'terms' => $term
)
)
);

genesis_custom_loop( wp_parse_args( $query_args , $args ) );
}

remove_action('genesis_post_content', 'genesis_do_post_content');
add_action('genesis_post_content', 'wps_do_axlesizes_content');
function wps_do_axlesizes_content() {
global $post;

$size = 'thumbnail'; // Change this to whatever add_image_size you want
$default_attr = array(
'class' => "alignleft attachment-$size",
'alt' => $post->post_title,
'title' => $post->post_title,
);

// check if the post has a Post Thumbnail assigned to it.
if ( has_post_thumbnail() ) {
printf( '<a href="%s" title="%s">%s</a>', get_permalink(), the_title_attribute( 'echo=0' ), genesis_get_image( array( 'size' => $size, 'attr' => $default_attr ) ) );
}

the_content( __( '[Read more...]' , 'genesis' ) );

printf( '<a href="%s" title="%s">%s</a>', get_permalink(), the_title_attribute( 'echo=0' ), __( 'click for specifications' ) );

echo '<div class="clear"></div>';
}

add_action( 'genesis_before_content' , 'rdwd_page_title' , 10 );
function rdwd_page_title() {
?>
<h1>Disc Brake Kits</h1>
<?php
}

genesis();
[/php]

Written by Travis Smith · Categorized: Custom Post Types, Genesis

Jan 03 2012

Developing a Custom Post Type and a Custom Taxonomy in Genesis with Custom Pages, Part 2

In the previous tutorial, Developing a Custom Post Type and a Custom Taxonomy in Genesis with Custom Pages, Part 1, we covered the following:

  1. Register your Custom Post Type
  2. Register your Custom Taxonomy
  3. Create my Metaboxes
  4. Clear Permalinks

Now that we have registered our custom post type and taxonomy and created our custom metabox, we will work on displaying them using a custom page template. In this tutorial, we will walk through how to Create the Single Page Template for the Custom Post Type. Note that this will be different from custom post type to custom post type. This is how a single post inside the custom post type will appear. However, I will walk you through a basic setup.

A. File Setup

First, create the file as single-{cpt_registered_name}.php (WordPress Codex). So in our case, it will be single-wps_discbrakes.php.

B. Menu Move

Now, for this example, I want to use a menu system. So I will be using the secondary menu system to accomplish this, and I want this to appear below the title.

[php]<?php
// Place the secondary navigation menu below the title
remove_action( 'genesis_after_header', 'genesis_do_subnav' );
add_action( 'genesis_after_post_title', 'genesis_do_subnav' );

// Enable the secondary navigation menu for single post type
add_filter( 'genesis_options', 'wps_define_genesis_setting' , 10, 2 );
function wps_define_genesis_setting( $options, $setting ) {
if( $setting == GENESIS_SETTINGS_FIELD ) {
$options['subnav'] = 1;
}
return $options;
}
[/php]

If you notice, I have programmatically turn on the secondary menu. However, in Genesis > Theme Settings, sitewide, I have the secondary navigation system turned off. Now, for this page template, I have selectively turned it on.

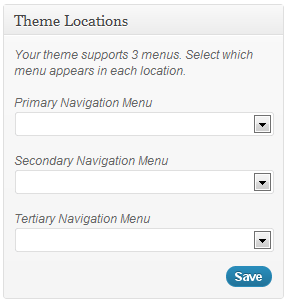
If you use the secondary navigation for your site, simply register a new navigation system and then add it. First, you will need to add this code to functions.php:
[php]<?php
register_nav_menu( 'tertiary', 'Tertiary Navigation Menu' );
function wps_do_subsubnav() {
if ( has_nav_menu( 'tertiary' ) ) {

$args = array(
'theme_location' => 'tertiary',
'container' => '',
'menu_class' => genesis_get_option('subnav_superfish') ? 'nav superfish' : 'nav',
'echo' => 0
);

$subsubnav = wp_nav_menu( $args );

}
$subsubnav_output = sprintf( '<div id="subsubnav">%2$s%1$s%3$s</div>', $subsubnav , genesis_structural_wrap( 'subsubnav', '<div class="wrap">', 0 ) , genesis_structural_wrap( 'subsubnav', '</div><!-- end .wrap -->' , 0 ) );
echo apply_filters( 'wps_do_subsubnav', $subsubnav_output , $subsubnav , $args );
}[/php]

Since Genesis structural wraps do not natively extend beyond nav and subnav, you can use genesis_structural_wrap( 'subnav', '<div class="wrap">', 0 ) if you prefer. You should now see the third menu location in Appearance > Menus.

Now you may or may not (most likely not), see your new custom post types and custom taxonomies list on the left under pages and custom links.

To have your new custom post types and custom taxonomies lists appear click on screen options at the top right and select (check) the custom post type and custom taxonomy.
Menu Screen Options 1

Menu Screen Options 2

Then you would add the following to the single template:
[php]<?php
remove_action( 'genesis_after_header', 'genesis_do_subnav' );
add_action( 'genesis_after_post_title', 'wps_do_subsubnav' );
[/php]

C. POST META/POST INFO

Now, I would like to remove the post meta and post info.
[php]<?php
// Remove the post info function
remove_action( 'genesis_before_post_content', 'genesis_post_info' );

// Remove the post meta function
remove_action( 'genesis_after_post_content', 'genesis_post_meta' );
[/php]

D. Custom Content **VERY IMPORTANT

Finally, I want to create my custom display of the content. This section will dramatically change from custom post type to custom post type based on what type of information you'd like to display and how you'd like to display it.

[php]<?php
remove_action( 'genesis_post_content', 'genesis_do_post_content' );
add_action( 'genesis_post_content', 'wps_do_diskbrakes_content' );
function wps_do_diskbrakes_content() {
global $post;

//setup thumbnail image args to be used with genesis_get_image();
$size = 'full'; // Change this to whatever add_image_size you want
$default_attr = array(
'class' => "aligncenter attachment-$size",
'alt' => $post->post_title,
'title' => $post->post_title,
);

// check if the post has a Post Thumbnail assigned to it. You can delete the if conditional if you want and assume that there will always be a thumbnail
if ( has_post_thumbnail() ) {
echo '<div class="clear"></div>';
printf( '<a href="%s" title="%s">%s</a>', get_permalink(), the_title_attribute( 'echo=0' ), genesis_get_image( array( 'size' => $size, 'attr' => $default_attr ) ) );
}
//else {} // you can add a default thumbnail conditional here if you want.

// display features from the metabox and custom fields
echo "<div class='discbrakes-features'>";
echo "<h3>Features</h3>";
echo "<ul>";
echo "<li><span class='feature-title'>Part Number:</span> <span class='feature'>" . genesis_get_custom_field( '_wps_part_number' ) . "</span></li>";
echo "<li><span class='feature-title'>Rotor:</span> <span class='feature'>" . genesis_get_custom_field( '_wps_rotor' ) . "</span></li>";
echo "<li><span class='feature-title'>Caliper:</span> <span class='feature'>" . genesis_get_custom_field( '_wps_caliper' ) . "</span></li>";
echo "<li><span class='feature-title'>Mounting Brake:</span> <span class='feature'>" . genesis_get_custom_field( '_wps_mounting_bracket' ) . "</span></li>";
echo "<li><span class='feature-title'>Weight/Axle Set:</span> <span class='feature'>" . genesis_get_custom_field( '_wps_weight_per_axle_set' ) . "</span></li>";
echo "</ul>";
echo "</div>";

// Display the content, if the content editor has content
if( $post->post_content != "" ) {
echo "<div class='discbrakes-description'>";
echo "<h3>Description</h3>";
the_content( __( '[Read more...]' , 'genesis' ) );
echo "</div>";
}
}
[/php]

E. Include the Genesis Framework **VERY IMPORTANT

[php]<?php
genesis();
[/php]

The next step would be to style the single page template accordingly and as needed.

So our finished product is this: single-wps_axlesizes.php
[php]
<?php

/**
* Single CPT Template: wps_axlesizes
*
* This file is responsible for the display of
* single posts of the custom post type wps_axlesizes.
*
* @author Travis Smith <[email protected]>
* @copyright Copyright (c) 2011, Travis Smith
* @license http://opensource.org/licenses/gpl-2.0.php GNU Public License
*
*/

// Place the secondary navigation menu below the title
remove_action( 'genesis_after_header', 'genesis_do_subnav' );
add_action( 'genesis_after_post_title', 'genesis_do_subnav' );

// Enable the secondary navigation menu for single post type
add_filter('genesis_options', 'wps_define_genesis_setting' , 10, 2);
function wps_define_genesis_setting( $options, $setting ) {
if( $setting == GENESIS_SETTINGS_FIELD ) {
$options['subnav'] = 1;
}
return $options;
}

// Remove the post info function
remove_action( 'genesis_before_post_content', 'genesis_post_info' );

// Remove the post meta function
remove_action( 'genesis_after_post_content', 'genesis_post_meta' );

remove_action( 'genesis_post_content', 'genesis_do_post_content' );
add_action( 'genesis_post_content', 'wps_do_diskbrakes_content' );
function wps_do_diskbrakes_content() {
global $post;

//setup thumbnail image args to be used with genesis_get_image();
$size = 'full'; // Change this to whatever add_image_size you want
$default_attr = array(
'class' => "aligncenter attachment-$size",
'alt' => $post->post_title,
'title' => $post->post_title,
);

// check if the post has a Post Thumbnail assigned to it. You can delete the if conditional if you want and assume that there will always be a thumbnail
if ( has_post_thumbnail() ) {
echo '<div class="clear"></div>';
printf( '<a href="%s" title="%s">%s</a>', get_permalink(), the_title_attribute( 'echo=0' ), genesis_get_image( array( 'size' => $size, 'attr' => $default_attr ) ) );
}
//else {} // you can add a default thumbnail conditional here if you want.

// display features from the metabox and custom fields
echo "<div class='discbrakes-features'>";
echo "<h3>Features</h3>";
echo "<ul>";
echo "<li><span class='feature-title'>Part Number:</span> <span class='feature'>" . genesis_get_custom_field( '_wps_part_number' ) . "</span></li>";
echo "<li><span class='feature-title'>Rotor:</span> <span class='feature'>" . genesis_get_custom_field( '_wps_rotor' ) . "</span></li>";
echo "<li><span class='feature-title'>Caliper:</span> <span class='feature'>" . genesis_get_custom_field( '_wps_caliper' ) . "</span></li>";
echo "<li><span class='feature-title'>Mounting Brake:</span> <span class='feature'>" . genesis_get_custom_field( '_wps_mounting_bracket' ) . "</span></li>";
echo "<li><span class='feature-title'>Weight/Axle Set:</span> <span class='feature'>" . genesis_get_custom_field( '_wps_weight_per_axle_set' ) . "</span></li>";
echo "</ul>";
echo "</div>";

// Display the content, if the content editor has content
if( $post->post_content != "" ) {
echo "<div class='discbrakes-description'>";
echo "<h3>Description</h3>";
the_content( __( '[Read more...]' , 'genesis' ) );
echo "</div>";
}
}

genesis();
[/php]

Written by Travis Smith · Categorized: Custom Post Types, Genesis

Jan 02 2012

How to Determine Child/Ancestor with is_child() and is_ancestor()

I found this great piece of code at Codebyte.
Put the following in your functions.php file:
[php]
// Check if page is direct child
function wps_is_child( $page_id ) {
global $post;
if( is_page() && ( $post->post_parent == $page_id ) ) {
return true;
} else {
return false;
}
}
[/php]
[php]
// Check if page is an ancestor
function wps_is_ancestor( $post_id ) {
global $wp_query;
$ancestors = $wp_query->post->ancestors;
if ( in_array( $post_id, $ancestors ) ) {
return true;
} else {
return false;
}
}
[/php]

Written by Travis Smith · Categorized: WordPress

  • « Previous Page
  • 1
  • …
  • 27
  • 28
  • 29
  • 30
  • 31
  • …
  • 61
  • Next Page »
  • Twitter
  • Facebook
  • LinkedIn
  • Google+
  • RSS

Copyright © 2025 � WP Smith on Genesis on Genesis Framework � WordPress � Log in