WP Smith

Creating WordPress & Genesis Websites Since 2010

  • Home
  • About
  • Services
  • Blog
  • Contact

Mar 11 2011

Create a Widgeted Home Page for Genesis Prose with Google Ads Spaces

I have never used Google ads, but I believe this is a great way to create a front page with 5 posts - Google Ads - 5 posts - Google Ads.

Create a new blank text file and call it home.php and copy and paste this code into it (or download: [download id="1"]).

[php]<?php get_header(); ?>
<?php genesis_home(); ?>

<div id="home-top-bg">
<div id="home-top">

<div class="home-top">
<?php if (!dynamic_sidebar('Home Top')) : ?>
<div class="widget">
<h4><?php _e("Home Top", 'genesis'); ?></h4>
<p><?php _e("This is a widgeted area which is called Home Top. It is using the Genesis - Featured Posts widget to display desired posts. To get started, log into your WordPress dashboard, and then go to the Appearance > Widgets screen. There you can drag the Genesis - Featured Posts widget into the Home Top widget area on the right hand side.", 'genesis'); ?></p>
</div>
<?php endif; ?>
</div><!-- end .home-top -->

<div class="home-google-ad-area-1">
<?php if (!dynamic_sidebar('Google Ad Area 1')) : ?>
<div class="widget">
<h4><?php _e("Google Ad Area 1", 'genesis'); ?></h4>
<p><?php _e("This is a widgeted area which is called Google Ad Area 1. Use the text widget to move Google Ad information into this area. To get started, log into your WordPress dashboard, and then go to the Appearance > Widgets screen. There you can drag the Text widget into the Google Ad Area 1 widget area on the right hand side.", 'genesis'); ?></p>
</div>
<?php endif; ?>
</div><!-- end .home-google-ad-area-1 -->

<div class="home-bottom">
<?php if (!dynamic_sidebar('Home Bottom')) : ?>
<div class="widget">
<h4><?php _e("Home Bottom", 'genesis'); ?></h4>
<p><?php _e("This is a widgeted area which is called Home Bottom. It is using the Genesis - Featured Posts widget to display desired posts. To get started, log into your WordPress dashboard, and then go to the Appearance > Widgets screen. There you can drag the Genesis - Featured Posts widget into the Home Bottom widget area on the right hand side.", 'genesis'); ?></p>
</div>
<?php endif; ?>
</div><!-- end .home-bottom -->

<div class="home-google-ad-2">
<?php if (!dynamic_sidebar('Google Ad Area 2')) : ?>
<div class="widget">
<h4><?php _e("Google Ad Area 2", 'genesis'); ?></h4>
<p><?php _e("This is a widgeted area which is called Google Ad Area 2. Use the text widget to move Google Ad information into this area. To get started, log into your WordPress dashboard, and then go to the Appearance > Widgets screen. There you can drag the Text widget into the Google Ad Area 1 widget area on the right hand side.", 'genesis'); ?></p>
</div>
<?php endif; ?>
</div><!-- end .home-google-ad-area-2 -->

</div><!-- end #home-top -->
</div><!-- end #home-top-bg -->

<?php get_footer(); ?>[/php]

Then register the widget sidebars by adding the following to your functions.php.

[php]// Register widget areas
genesis_register_sidebar(array(
'name'=>'Home Top',
'id' => 'home-top',
'description' => 'This is the top post section of the homepage.',
'before_widget' => '<div id="%1$s" class="widget %2$s">', 'after_widget'  => '</div>',
'before_title'=>'<h4 class="widgettitle">','after_title'=>'</h4>'
));
genesis_register_sidebar(array(
'name'=>'Home Bottom',
'id' => 'home-bottom',
'description' => 'This is the bottom post section section of the homepage.',
'before_widget' => '<div id="%1$s" class="widget %2$s">', 'after_widget'  => '</div>',
'before_title'=>'<h4 class="widgettitle">','after_title'=>'</h4>'
));
genesis_register_sidebar(array(
'name'=>'Google Ad Area 1',
'id' => 'home-google-ad-area-1',
'description' => 'This is the first Google ad section of the homepage.',
'before_widget' => '<div id="%1$s" class="widget %2$s">', 'after_widget'  => '</div>',
'before_title'=>'<h4 class="widgettitle">','after_title'=>'</h4>'
));
genesis_register_sidebar(array(
'name'=>'Google Ad Area 2',
'id' => 'home-google-ad-area-2',
'description' => 'This is the second Google ad section of the homepage.',
'before_widget' => '<div id="%1$s" class="widget %2$s">', 'after_widget'  => '</div>',
'before_title'=>'<h4 class="widgettitle">','after_title'=>'</h4>'
));[/php]

Written by Travis Smith · Categorized: Genesis, Tutorials

Mar 10 2011

How to Customize the Genesis Comment Form

Here's how to customize the Genesis Comment form.
[php]add_filter('genesis_comment_form_args', 'custom_genesis_comment_form_args');
/**
* Modify comments
*/
function custom_genesis_comment_form_args($args) {
$args = array (
'title_reply' => __( 'Leave a Comment', 'genesis' ), //default='Speak Your Mind'; WordPress deafult: __( 'Leave a Reply' )
'label_submit' => __( 'Submit Comment', 'genesis' ), //default='Post Comment'
'title_reply_to' => __( 'Reply Title', 'genesis' ), //Default: __( 'Leave a Reply to %s' )
'cancel_reply_link' => __( 'Cancel', 'genesis' ) //Default: __( 'Cancel reply' )
);
return $args;
}[/php]

To Change the Reply Link Text or the Login to Comment Text, add this to your functions.php, which is largely borrowed from WordPress core so it maintains the same functionality.
[php]add_filter('comment_reply_link', 'custom_comment_reply_link');
function custom_comment_reply_link($args) {
global $user_ID;

$args = array(
'reply_text' => __('Debate'), // WordPress/Genesis Default: Reply
'login_text' => __('Please Log in First')); // WordPress/Genesis Default: Log in to leave a comment

$defaults = array('add_below' => 'comment', 'respond_id' => 'respond', 'reply_text' => __('Reply'),
'login_text' => __('Log in to Reply'), 'depth' => 0, 'before' => '', 'after' => '');

$args = wp_parse_args($args, $defaults);

extract($args, EXTR_SKIP);

$comment = get_comment($comment);
if ( empty($post) )
$post = $comment->comment_post_ID;
$post = get_post($post);

if ( !comments_open($post->ID) )
return false;

$link = '';

if ( get_option('comment_registration') && !$user_ID )
$link = '<a rel="nofollow" class="comment-reply-login" href="' . esc_url( wp_login_url( get_permalink() ) ) . '">' . $login_text . '</a>';
else
$link = "<a class='comment-reply-link' href='" . esc_url( add_query_arg( 'replytocom', $comment->comment_ID ) ) . "#" . $respond_id . "' onclick='return addComment.moveForm("$add_below-$comment->comment_ID", "$comment->comment_ID", "$respond_id", "$post->ID")'>$reply_text</a>";
return $link;
}[/php]

You can edit the comment form (to add WILL NOTE BE PUBLISHED beside the Email, etc.) with this code in your [I]functions.php[/I] file.

[php]add_filter('genesis_comment_form_args','custom_email_note');
function custom_email_note() {
$args = array(
'fields' => array(
'author' => '<p class="comment-form-author">' .
'<input id="author" name="author" type="text" value="' . esc_attr( $commenter['comment_author'] ) . '" size="30" tabindex="1"' . $aria_req . ' />' .
'<label for="author">' . __( 'Name', 'genesis' ) . '</label> ' .
( $req ? '<span class="required">*</span>' : '' ) .
'</p><!-- #form-section-author .form-section -->',

'email' => '<p class="comment-form-email">' .
'<input id="email" name="email" type="text" value="' . esc_attr( $commenter['comment_author_email'] ) . '" size="30" tabindex="2"' . $aria_req . ' />' .
'<label for="email">' . __( 'Email: Not Published', 'genesis' ) . '</label> ' .
( $req ? '<span class="required">*</span>' : '' ) .
'</p><!-- #form-section-email .form-section -->',

'url' => '<p class="comment-form-url">' .
'<input id="url" name="url" type="text" value="' . esc_attr( $commenter['comment_author_url'] ) . '" size="30" tabindex="3" />' .
'<label for="url">' . __( 'Website', 'genesis' ) . '</label>' .
'</p><!-- #form-section-url .form-section -->'
),

'comment_field' => '<p class="comment-form-comment">' .
'<textarea id="comment" name="comment" cols="45" rows="8" tabindex="4" aria-required="true"></textarea>' .
'</p><!-- #form-section-comment .form-section -->',

'title_reply' => __( 'Speak Your Mind', 'genesis' ),

'comment_notes_before' => '',

'comment_notes_after' => '',
);
return $args;
}[/php]

Written by Travis Smith · Categorized: Genesis, Tutorials

Mar 09 2011

Create Your Own Custom Genesis Category Archive Template in WordPress

Someone in the StudioPress Support forums wanted a Category Archive Template that listed categories and posts under that category. For example:
Category 1

  • article 1
  • article 2
  • article n

Category 2

  • article 1
  • article 2
  • article n

So, here it is:

[php]<?php /** * Template Name: Category Archive */ get_header(); ?></p>
<p><?php genesis_before_content_sidebar_wrap(); ?></p>
<div id="content-sidebar-wrap">
<p> <?php genesis_before_content(); ?></p>
<div id="content">
<p> <?php genesis_before_loop(); ?></p>
<div class="post hentry">
<h1 class="entry-title"><?php _e("Site Archives", 'genesis'); ?></h1>
<div class="entry-content">
<p> <?php $categories = get_categories( $args );?> </p>
<ul class="catArchive">
<?php foreach ($categories as $category) { $catCounter++; $catLink=get_category_link($category->term_id);<br />
$catStyle = '';<br />
if (is_int($catCounter / 2)) $catStyle = ' class="catAlt"';</p>
<p> echo '<li'.$catStyle.'>
<h3><a href="'.$catLink.'" title="'.$category->name.'">'.$category->name.'</a></h3>
<p>';<br />
echo '
<ul>';</p>
<p> query_posts('cat='.$category->term_id.'&showposts=5');?></p>
<p> <?php while (have_posts()) : the_post(); ?></p>
<li><a href="<?php the_permalink() ?>" rel="bookmark" title="<?php the_title(); ?>"><?php the_title(); ?></a></li>
<p> <?php endwhile; ?></p>
<li><a href="<?php echo $catLink; ?>" title="<?php echo $category->name; ?>">More <strong><?php echo $category->name; ?></strong></a></li>
</ul>
</li>
<p> <?php } ?>
</ul>
</div>
<p><!-- end .entry-content --></p>
</div>
<p><!-- end .post --><br />
<?php genesis_after_loop(); ?></p>
</div>
<p><!-- end #content --><br />
<?php genesis_after_content(); ?></p>
</div>
<p><!-- end #content-sidebar-wrap --><br />
<?php genesis_after_content_sidebar_wrap(); ?></p>
<p><?php get_footer(); ?><br />
[/php]

To add this to your child theme, simply follow these directions.
1. Open a blank text file.
2. Copy this code into it.
3. Save as page_catarchive.php (or just download: [download id="2"])
4. FTP into your child theme folder.

To use in your theme, create a new page and select Category Archive under Page Template.

Click Publish. Style via your CSS.

Written by Travis Smith · Categorized: Genesis, Tutorials

Mar 09 2011

StudioPress's Genesis Featured Post Glitch with Show Content

Recently in working with the Featured Posts Widget for my sites (and then seeing this post in the StudioPress forums), I've learned that there is a "glitch" in its code or in the use of the widget. Either way, the code should be updated to protect against user error.

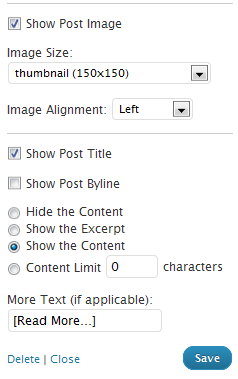
Scenario: User creates a post. Inserts an image into the post so that when it appears as a single post page, the image appears as the user desires. Then they set that same image as the featured image. So let's say that they set the image on the first line as a class of alignleft.

Now if they were to select to show the content (and show content limit may also cause problems depending on where the image is and how it gets pulled into the_content();), as in all of the content, then that's where the problem arises.

Featured Posts Widget SettingsThe featured posts shows the content which includes the image that is set in the post. So now there are two images showing as can be seen here.
Featured Posts Front Page

Furthermore, there are several widgets out there that extend the Genesis Featured Post widget (or vice versa).

Solution: But the problem can be prevented in two ways.

First, as a band-aid of sorts, there are two solutions that we can use as users without hacking core, because we should never hack core. First, is always use Show Content Limit and set accordingly (trial & error) or use Excerpt. Second, do not insert the picture on your post and add this code to your functions.php file, which will place the image at the top of the post aligned to the left. If you want to align it to the right simply change alignleft to alignright or aligncenter to align center.

[php]add_action('genesis_before_post_content','add_featured_image');
add_image_size('Medium 16x9', 400, 225, TRUE);
function add_featured_image(){
if (is_single() && (get_post_type() != 'attachment')) {
genesis_image("format=html&size=Medium 16x9&attr=class=alignleft");
}
}[/php]

Medium 16x9 can be changed to whatever title description you'd like. If you change the description in add_image_size, then change it in genensis_image. And the dimensions can be changed to whatever you'd like where width = 400 and height = 225. genesis_add_image_size($name, $width = 0, $height = 0, $crop = FALSE); is used but is also deprecated probably because WordPress has image_size( $name, $width = 0, $height = 0, $crop = FALSE);.

Second, the solution can be solved by StudioPress in the core of Genesis by changing the code in featured-post-widget.php at about line 58 (and probably featured-page-widget.php at about line 44). The original code has:

[php]if(!empty($instance['show_image'])) :
printf( '<a href="%s" title="%s">%s</a>', get_permalink(), the_title_attribute('echo=0'), esc_attr( $instance['image_alignment'] ), genesis_get_image( array( 'format' => 'html', 'size' => $instance['image_size'] ) ) );
endif;
[/php]

And it could be changed to the following so it doesn't show the image to eliminate user confusion. While it doesn't have to be changed, it is the most user-friendly approach.

[php]if(!empty($instance['show_image'])) :
if(!empty($instance['show_content'])) :
if($instance['show_content'] == 'content') :
printf( '<a href="%s" class="%s" title="%s">%s</a>', get_permalink(), the_title_attribute('echo=0'), esc_attr( $instance['image_alignment'] ), genesis_get_image( array( 'format' => 'html', 'size' => $instance['image_size'] ) ) );
endif;
endif;
endif;
[/php]

Written by Travis Smith · Categorized: Genesis, Tutorials

Mar 07 2011

Using Shopp on Your Local XAMPP WordPress Installation: Enabling cURL

In order to use Shopp, you need to have cURL installed and running as mentioned on the features page. Use this plugin to determine whether your WordPress setup has everything you need.

However, XAMPP does not come with cURL already ready to go. In order to make your local WordPress installation compatible with Shopp, you need to turn on cURL.

First, locate your php.ini file in your xampp folder. If you went with the generic login, then the php.ini file can be located at C:xamppphpphp.ini.

Then, it’s really quite simple - uncomment extension=php_curl.dll in your php.ini file, then restart Apache.

Once you have done this, save. Stop Apache, refresh and restart Apache. Everything you need to run CURL on a XAMPP install is included in the download.

Written by Travis Smith · Categorized: Tutorials

  • « Previous Page
  • 1
  • …
  • 51
  • 52
  • 53
  • 54
  • 55
  • …
  • 61
  • Next Page »
  • Twitter
  • Facebook
  • LinkedIn
  • Google+
  • RSS

Copyright © 2025 � WP Smith on Genesis on Genesis Framework � WordPress � Log in