WP Smith

Creating WordPress & Genesis Websites Since 2010

  • Home
  • About
  • Services
  • Blog
  • Contact

Jul 27 2010

Using Custom Menus to Create Custom Menus Based on Role/Capabilities

So thanks to Nathan Rice (@nathanrice), creator of Genesis, I was able to complete my code to create menus based on user roles and capabilities. On one of my sites, the user wanted to display three different menus based on one's user roles and capabilities:

  1. One to display if a person was a Contributor or higher (read, edit posts, etc.).
  2. One to display if a person was a Subscribor (read)
  3. One to display for a visitor (none)

So as I stumbled through the code, here is the final code for Genesis Users. For non-Genesis users simply change 'menu_class' => genesis_get_option('nav_superfish') ? 'nav superfish' : 'nav', to 'menu_class' => '',. And you will need to change the add_action and remove_action code.

[php]//Custom Menu Based on Roles/Capabilities
remove_action('genesis_after_header', 'genesis_do_nav');
add_action('genesis_after_header', 'custom_genesis_do_nav');
function custom_genesis_do_nav() {

if ( current_user_can('edit_posts') ) {
$nav = wp_nav_menu(array(
'theme_location' => 'primary',
'menu' => 1,
'container' => '',
'menu_class' => genesis_get_option('nav_superfish') ? 'nav superfish' : 'nav',
'echo' => 0
));
printf( '<div id="nav"><div class="wrap">%s</div></div>', $nav );
}
elseif ( current_user_can('read') && !current_user_can('edit_posts') ) {
$nav = wp_nav_menu(array(
'theme_location' => 'primary',
'menu' => 2,
'container' => '',
'menu_class' => genesis_get_option('nav_superfish') ? 'nav superfish' : 'nav',
'echo' => 0
));
printf( '<div id="nav"><div class="wrap">%s</div></div>', $nav );
}
elseif(!current_user_can('read') && !current_user_can('edit_posts') ) {
$nav = wp_nav_menu(array(
'theme_location' => 'primary',
'menu' => 3,
'container' => '',
'menu_class' => genesis_get_option('nav_superfish') ? 'nav superfish' : 'nav',
'echo' => 0
));
printf( '<div id="nav"><div class="wrap">%s</div></div>', $nav );

}
else //just in case
{
genesis_do_nav();
}

} [/php]

To get the menu id number, simply go to Appearance > Menus. When you mouse over the menus, you should see a URL like http://mydomain.com/wp-admin/nav-menus.php?action=edit&menu=44. The menu=44 is your menu ID. When you click on them the URL should appear in the address bar if you cannot see the URLs in the status bar.
Written by Travis Smith · Categorized: Tutorials

Jul 20 2010

How to Add a Custom Message on the Login or Register Screen

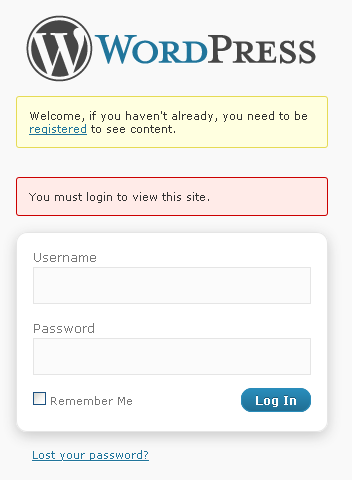
custom  login message
Click for a Larger Image

For one of my projects, I was asked to make the entire WordPress Blog login protected whereby people had to request via a form on the site for access. In doing this everyone was redirected to the login form without a registration link (because they did not want to use the traditional WordPress registration and preferred a manual registration). Anyways, I had to add a message on the login screen to point people to a contact form. Since WordPress 2.8, you can add a custom_login_message. There are a ton of plugins that will help you customize the look of the login screen; however, none that I could find helped you add any text or links to the login screen without simply highjacking the core code or replacing all of the wp-login.php file with a custom one. So here is what you can do:

[php]function custom_login_message() {
$message = "<p class='message'>Welcome, if you haven't already, you need to be <a href='http://photoblog.smithsaga.com/registration/'>registered</a> to see content.</p><br />";
return $message;
}
add_filter('login_message', 'custom_login_message');
?>[/php]

The p class='message' puts the message in a yellow box. If you prefer red, simply change message to login_error.

And if you want a custom message on the registration screen:

[php]function custom_register_message() {
$message = "<p class='message'>Welcome, if you haven't already, you need to be <a href='http://photoblog.smithsaga.com/registration/'>registered</a> to see content.</p><br />";
return $message;
}
add_filter('register_message', 'custom_register_message');
[/php]

Written by Travis Smith · Categorized: Tutorials

Jul 06 2010

Pictorial Tutorial on WordPress Security: Change the WP_ Prefix

The best and most advisable way to do this is to use the plugin called WP Security Scan by Semper Fi Web Design. However, for some people the database table name prefix changing functionality of WP Security Scan doesn’t work. If that is the case, here is how you can do it manually.

1. Deactivate your plugins if you have already installed and activated your plugins.

wordpress security change wp prefix
Click for a Larger Image

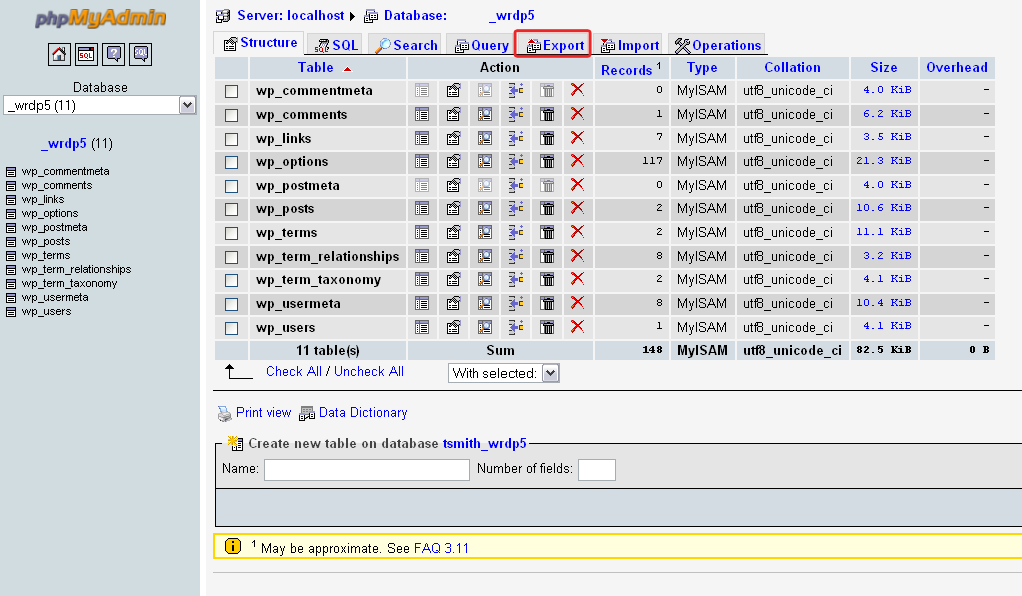
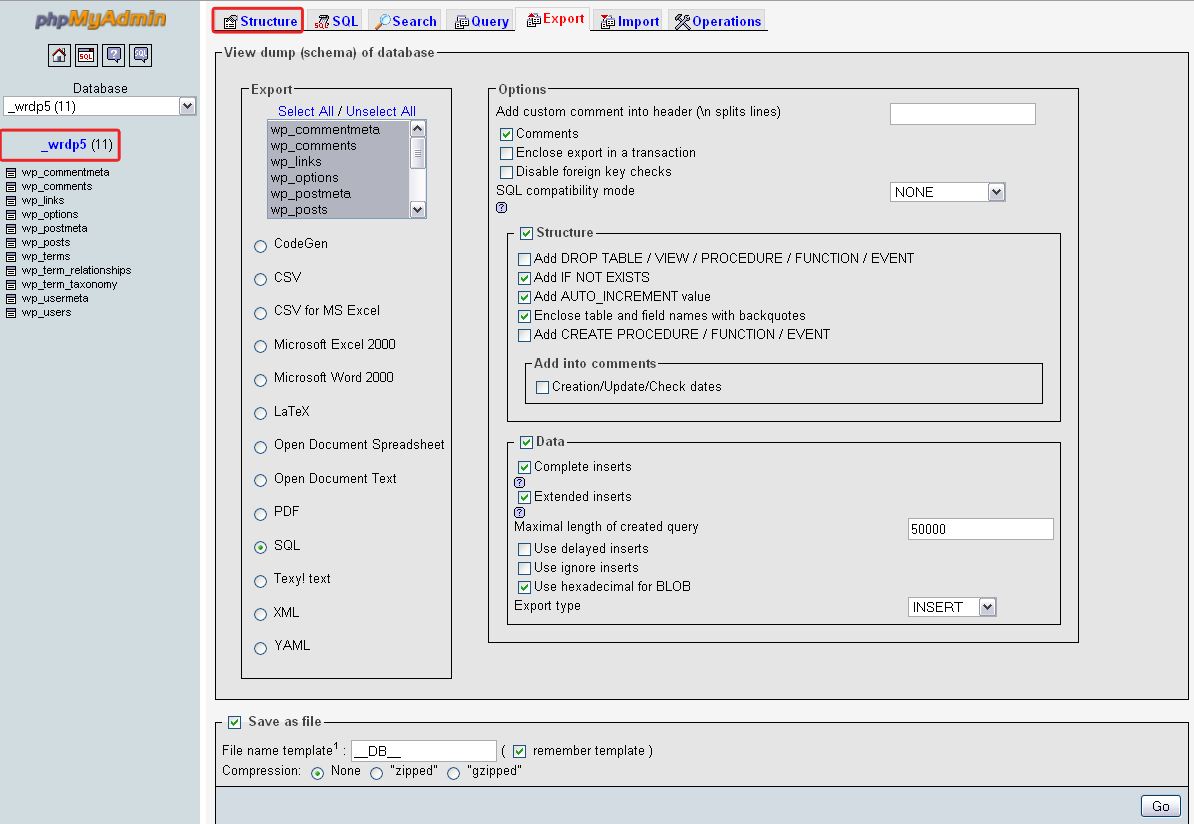
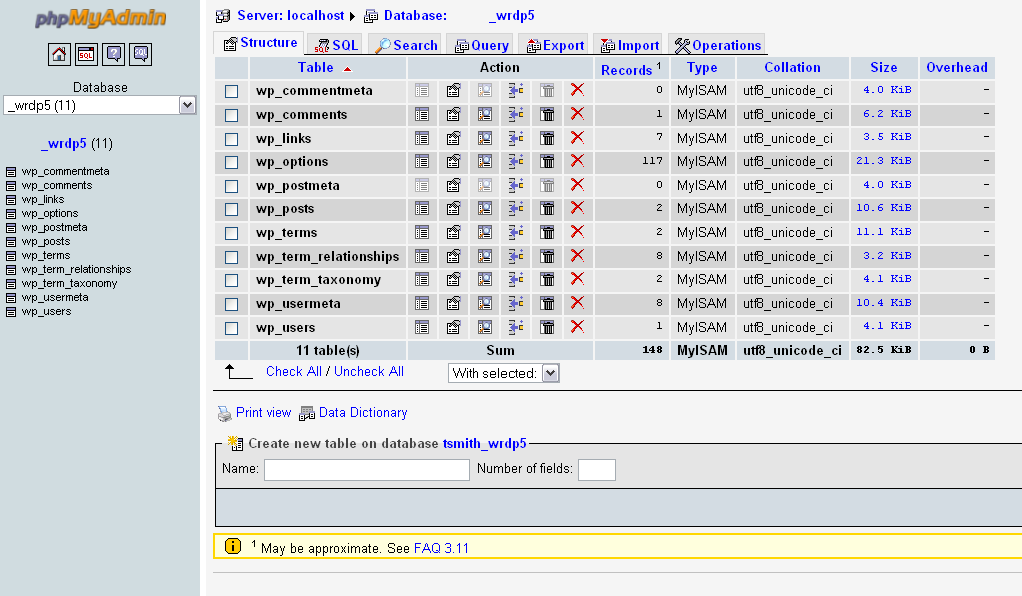
2. Backup your wordpress database to a SQL file. If you used Fantastico when you installed your WordPress, it should have told you what the name of the database was. Simply log into PHPMyAdmin, and select that database. When you select that database, you should see something like this: To backup your SQL database, simply go to EXPORT, and then ensure that SQL is selected on the left side, and then click GO. Save the file to whatever location (but remember that location).

wordpress security change wp prefix
Click for a Larger Image

3. First make a second copy of the SQL. To do this, simply click on the file and hit CTRL + C and then CTL + V. This should create the second file with name of "Copy of mySQL.sql". Open the first *.sql file using text editor (using a PC, Notepad ++ is great!; Mac, TextMate is good), then find and replace all “wp_” prefix to “something_” (make sure it is in lower case). If you haven't done anything with your blog, then there should be about 50 changes that were made. If there was more then, no worries!

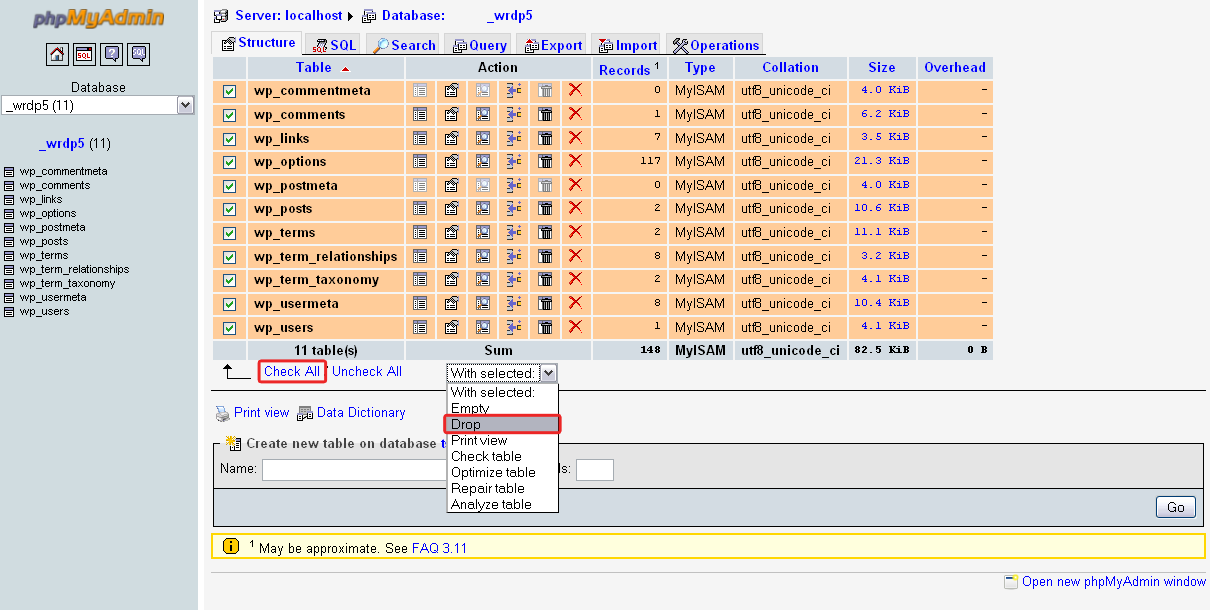
4. Now, you want to drop all tables of your wordpress databases without dropping the database entirely. To do this, simply click on your database on the left side in the blueish sidebar or click STRUCTURE.

wordpress security change wp prefix
Click for a Larger Image

And this will bring you back to the first screen you saw.

wordpress security change wp prefix
Click for a Larger Image

Click CHECK ALL and then change the dropbox "With Selected" to "Drop".

wordpress security change wp prefix
Click for a Larger Image

Which will bring up this screen:

wordpress security change wp prefix
Click for a Larger Image

Click Yes.

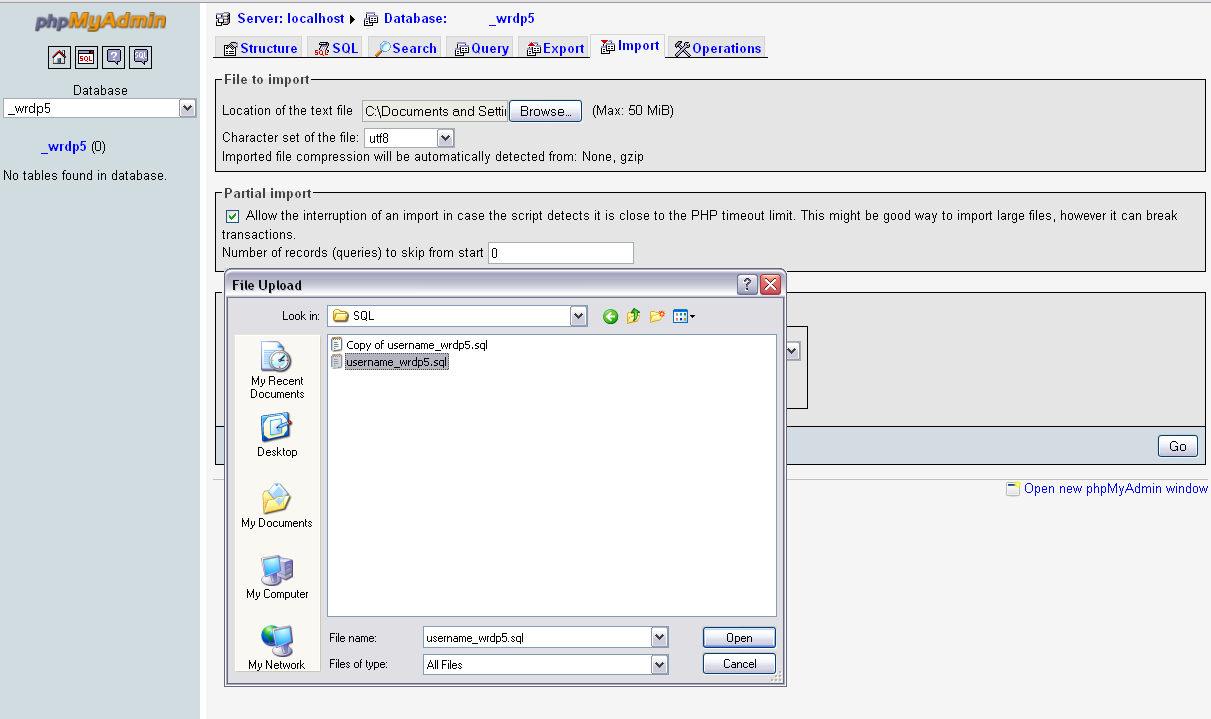
5. Next you want to import the *.sql file which has been edited before into your wordpress databases. To do this, simply go to IMPORT, browse and select the appropriate file.

wordpress security change wp prefix
Click for a Larger Image

6. Edit your wp-config.php file and change the $table_prefix = ‘wp_’; to $table_prefix = ‘something_’;. Typically this will be line 57 (if your wp-config is double-spaced, check line 114-ish or just search for it). Then you are all set! If you are still uncomfortable, I will be glad to help you. Just drop me a note.

Written by Travis Smith · Categorized: Tutorials

Jul 02 2010

Editing Network Options

When you are editing the Network Options, the options are fairly explainable. However, I wanted to add a couple things to some of the items. First you deal with Operational Settings, which include Network Name and Network Admin Email. Both are self-explainatory; however, the Network Name is what appears when a new blog is started on the domain. For example, if I were to start myblog on mydomain.com, just as WordPress has "Another WordPress blog" (or whatever), your multi-site will say "Just another My Network Name Site" for mysite.mydomain.com.

Under Dashboard Settings, the Dashboard Site, which was somewhat confusing for me at first, will create a sub-site if you wish to use a separate site to administer your users. If left blank (which it will default to if you enter anything with a space), it will add all new users to mydomain.com. Personally, I would also change the admin notice feed to something else other than the main site feed, as it recommends. I would also create a Feedburner feed so if I ever decide to change or manipulate it, I am dealing with Feedburner, which has a lot more flexibility unless you want to create your own RSS feed.

Under Registration Settings, if you have Registration disabled for whatever reason, you'll notice that Multi-Site recommends "please set NOBLOGREDIRECT in wp-config.php to a URL you will redirect visitors to if they visit a non-existent site." What is this? How do I do this?

First the define NOBLOGREDIRECT redirects a person to your chosen URL if/when someone enters a subdomain/subdirectory that does not exist on your site. You could use this to go to a SEARCH page, a FAQ page, or some other custom page. If you do not use this, then when someone enters http://badsubdomain.mydomain.com (a site that does not exist), it would direct them to the SIGNUP page asking whether or not the visitor can create the bad subdomain in question. Here is a good explanation on the NOBLOGREDIRECT and 404s.

Second, open wp-config.php and add among the define additions the following:

[php]<strong>define('NOBLOGREDIRECT', '%siteurl%');</strong>[/php]

The rest is fairly self-explanatory. Enjoy!

Written by Travis Smith · Categorized: Tutorials

Jul 01 2010

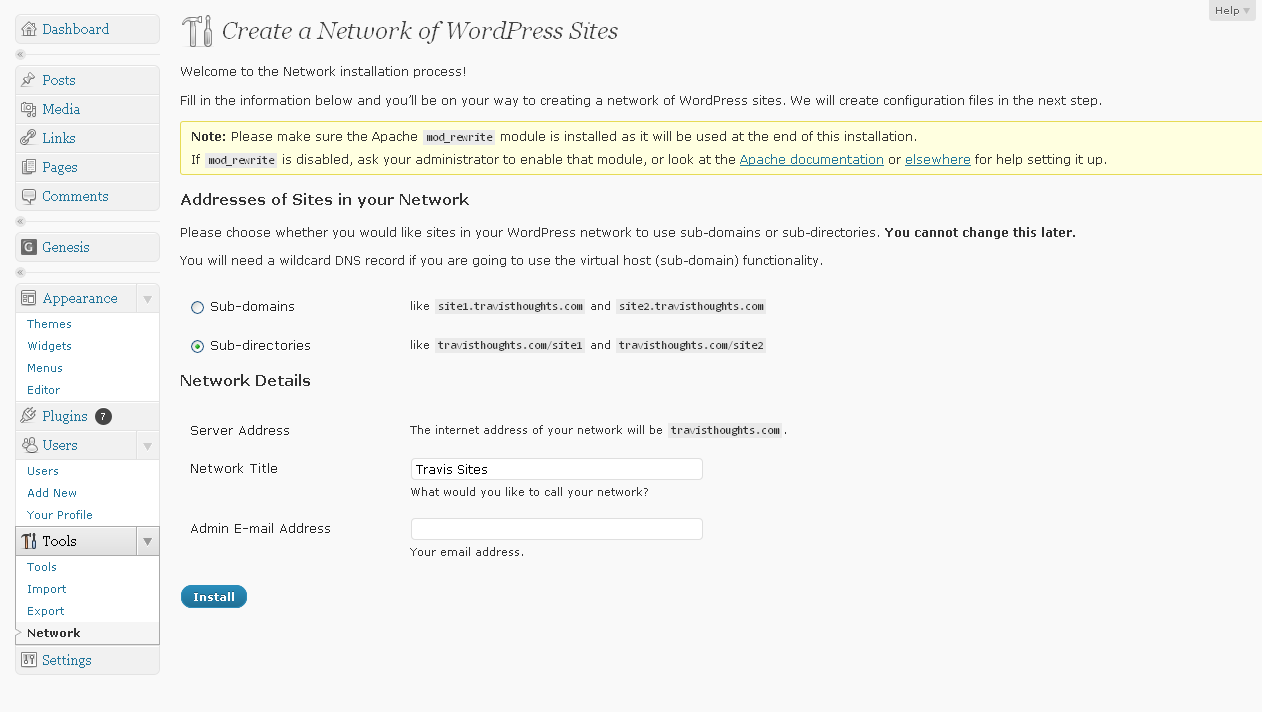
How to Enable WordPress 3.0 Multi-Site

Click for Larger image

To enable Multi-Site you must have access to the core WordPress files. You must have access to your .htaccess file as well.

Next you want to open wp-config.php in your favorite text editor and find the line (probably around line 70 if you are using a text editor with line numbers) that says /* That's all, stop editing! Happy blogging. */. Above this line (so line 68-69), add define('WP_ALLOW_MULTISITE', true);.

Then Network will appear under Tools.  Once it appears, click on Network. This will bring up a list of instructions, including deactivating all plugins. Decide whether you want to use Sub-domains (http://subdomain.mydomain.com) or sub-directories (http://mydomain.com/subdirectory). If you wish to use sub-domains, the first thing you want to do is add a subdomain of *. So log into cpanel (or whatever you are using), click on Add Subdomains. In subdomain, enter just an * (asterisk). Be sure to set your document root correctly if you have shared hosting. Then click CREATE. Once this is complete, then click INSTALL.

Click for Larger image

Otherwise you will get this error:

Click for Larger image

Then you want to open your text editor again with a new blank document, and select SAVE AS and name it "blog.dir" (without the "" marks). Then FTP this file to your mydomain.com/wp-content directory.

Follow steps 2-3 as they are on the screen editing the wp-config.php file again. So on line 68-69 before /* That’s all, stop editing! Happy blogging. */ add the following:

[php]define( 'MULTISITE', true );
define( 'SUBDOMAIN_INSTALL', true );
$base = '/';
define( 'DOMAIN_CURRENT_SITE', 'mydomain.com' );
define( 'PATH_CURRENT_SITE', '/' );
define( 'SITE_ID_CURRENT_SITE', 1 );
define( 'BLOG_ID_CURRENT_SITE', 1 );[/php]

You will also be given unique authentication keys that you will need to add. For example:

[php]define( 'AUTH_SALT', 'I)(-Zo_@`zf4S,{,)(li~,yd$95TyX X+N#~ehC-Y;5M~:Aj||D0dYij~Xg+Q3|V' );
define( 'SECURE_AUTH_SALT', '2k_cJ?_-#q$CAXQV#rj{AT %mb}iyN#?qit,0zujTTyzx(/%kg7XS86hf26iQ0:G' );
define( 'LOGGED_IN_SALT', ';u,XF m9(_!+(##Ql@Cy}jBKdb6~3h0]5XZtcR.V[[email protected]:0+4@v-ZF] q' );
define( 'NONCE_SALT', '4x3!hW|;l[*1m)KP.1L&1LfRU@7yX&l62j:h&4P_PCZ4Jkh}xaqSLWhi Q1v@C9Z' );[/php]

To create your .htaccess, open a blank file in your text editor, and copy this code:

[php]RewriteEngine On
RewriteBase /
RewriteRule ^index.php$ - [L]

# uploaded files
RewriteRule ^files/(.+) wp-includes/ms-files.php?file=$1 [L]

RewriteCond %{REQUEST_FILENAME} -f [OR]
RewriteCond %{REQUEST_FILENAME} -d
RewriteRule ^ - [L]
RewriteRule . index.php [L][/php]

Then click SAVE AS and name it .htaccess (with the period in the front). Then FTP this over to your root directory where your wp-config.php file sits. Once the new wp-config.php and the .htaccess files are setup and FTPed to the site. Click Log in.

Once you log back in, you will need to set the Options page, which is another post!

Click for Larger image

Written by Travis Smith · Categorized: Tutorials

  • « Previous Page
  • 1
  • …
  • 56
  • 57
  • 58
  • 59
  • 60
  • 61
  • Next Page »
  • Twitter
  • Facebook
  • LinkedIn
  • Google+
  • RSS

Copyright © 2025 � WP Smith on Genesis on Genesis Framework � WordPress � Log in