WP Smith

Creating WordPress & Genesis Websites Since 2010

  • Home
  • About
  • Services
  • Blog
  • Contact

Jun 20 2010

How to Display Only Twitter Messages with a Certain Hashtag

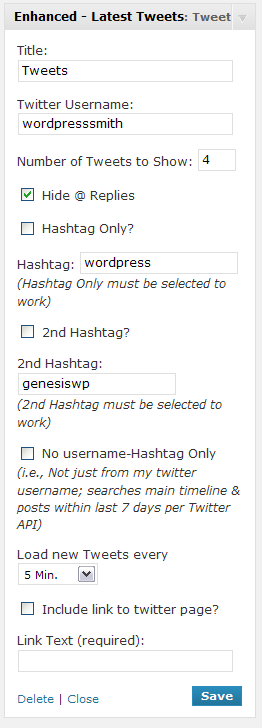
I see in a lot of places blogs about the ability to display their last tweet or tweets. However, I wanted to be able to display tweets that come from a specific user using a specific hashtag. So let's say anytime @bob wanted to tweet something with #somehash, the following PHP code will allow you to display just those tweets in WordPress. So you first need to decide (1) how many of the last tweets that you want to display ($count), (2) whether to hide replies, and (3) then what hashtag you would like to display (with or without the #).

I am working this into a twitter widget plugin.

[php]
$twitter_count= 5; //Set this to the number of tweets you want to display
$yourhashtag = 'myhashtag'; //Set this to a chose hashtag with or without #
$yourtwitter_username='username'; //Set this to your username with or without @
$twitter_hidereplies=False; //If you want to hide them, change to: $twitter_hidereplies=True;

//do not change anything below this line
$twitter_usernameA= '@'.str_replace("@","",$yourtwitter_username);
$twitter_username= str_replace("@","",$yourtwitter_username);

$twitter = wp_remote_retrieve_body( wp_remote_request( 'http://twitter.com/statuses/user_timeline/'. $twitter_username.'.json?count=1' ) );
$json = json_decode($twitter);
$count=$json[0]->user->statuses_count;

$twitter = wp_remote_retrieve_body( wp_remote_request( 'http://twitter.com/statuses/user_timeline/'. $twitter_username .'.json?count='.$count ) );
$json = json_decode($twitter);
if( is_wp_error($twitter) ) {
$tweets[] = '<li>There was an error while attempting to contact the Twitter API. Please try again.</li>' . "n";
}
elseif( $json->error ) {
$tweets[] = '<li>The Twitter API returned an error while processing your request. Please try again</li>' . "n";
}
else
{
$hashtag = '#'.str_replace("#","",$yourhashtag);
// Build the tweets array
foreach( (array)$json as $tweet )
{
// don't include @ replies (if applicable)
if( $twitter_hidereplies && $tweet->in_reply_to_user_id )
continue;

// stop the loop if we've got enough tweets
if( $tweets[$twitter_count - 1] )
break;

//adds tweets if hashtag_only was selected
$pos = strpos($tweet->text,$hashtag);
if ($pos === false)
continue;
$timeago = sprintf('about %s ago', human_time_diff(strtotime($tweet->created_at)));
$timeago_link = '<a href="http://twitter.com/'.$twitter_username.'/status/'.$tweet->id.'" rel="nofollow">'.$timeago.'</a>';
$tweets[] = '<li>'. $tweet->text . ' <span style="font-size: 85%;">' . $timeago_link . '</span></li>' . "n";
}
foreach( (array)$tweets as $tweet ) {
echo $tweet;}
}

[/php]

Written by Travis Smith · Categorized: Tutorials

Jun 18 2010

Enhanced Latest Tweets Widget Plugin

With the encouragement Enhanced Latest Tweets Widget Plugin Screenshotof Nathan Rice from StudioPress and the huge help from Nick the Geek, I have developed my first plugin.

Enhanced Latest Tweets Widget extends the twitter widget which will now allow you to display a certain number of tweets by a specified user with a specified hashtag in a widget. On the admin side, given the twitter username, you can tell:

  1. how many of the last tweets that you want to display,
  2. whether to hide replies, and
  3. then whether you want to limit the output to contain a certain hashtag (with or without the #).

This widget also enhances the Genesis Theme Framework Twitter Widget. This allows it to take full advantage of the styling already present in the Child Themes while providing the advanced hashtag feature.

This plugin works with the [Genesis Theme Framework] and [Thesis 1.7 Framework].

Here's the Plugin Page to Download

Written by Travis Smith · Categorized: WordPress

May 21 2010

How to Move Your Podcast and Blog from LibSyn.com (3.0) to WordPress with PodPress

I truly believe that WordPress is fully capable of running some high quality websites with a wide variety of features and functionality. And one of the great qualities of WordPress is its ability to have a variety of feeds and even podcast from WordPress instead of having to use a library. One of the best hosting companies to use if you are using WordPress and want to host your own podcast via podPress or even PowerPress or even Feedburner is Hostgator.

In this post, I am going to assume that you already have a WordPress blog and that you have already installed PodPress (but if you haven't simply go to Plugins > Add New, search for "Podpress" and select Install by PodPress and then Install Now, then Activate it). So how do you move your podcast and blog from LibSyn 3 to WordPress with podPress. This process requires proper setup of Podpress, the setup of Feedburner, and the adjustments in LibSyn.

1. Get your iTunes Feed ID & insert it into PodPress
Once the plugin has been activated, go to the PodPress > Feed/iTunes Settings, insert your iTunes Feed ID (http://phobos.apple.com/WebObjects/MZStore.woa/wa/viewPodcast?id=FEEDID). Then after you fill in everything else, click Update Options at the bottom.

You can ping your iTunes Feed ID here to see what the current feed is by filling out the form below (opens in a new tab). Upon submission it will tell you where iTunes is currently drawing your feed.

2. SetupFeedburner RSS PodcastingFeedburner
The reason that we need a Feedburner account, it makes transitions moving back and forth from different platforms while maintaining a good solid RSS. So while I am tinkering with my WordPress feed and setting up my podPress feed, the feed for my podcast is secure. Then when I am ready, I can adjust my feed in feedburner without having to hit iTunes with their XML new-feed tag. So you'll want to setup a Feedburner feed for your podcasts. To do this, go to Feedburner and create a podcast feed. If you have a Gmail or a Google account, log in using that. If you don't, create one because you will definitely need it. Then under "Burn a feed right this instant. Type your blog or feed address here:" enter you LibSyn.com RSS feed, which will be something like: http://yourusername.libsyn.com/rss. Then click on "I'm a podcaster" which will bring up Smartcast for you, which will have all the elements needed for iTunes. Then click NEXT. Fill in the Title and Feed Address. Then click NEXT twice. Under Smartcast, fill in the information just like you have in PodPress, and click NEXT. Then select whether you want the additional statistics and click NEXT, and you're done!

3. Export Your LibSyn Blog
Then go to your LibSyn RSS feed. You can go to libsyn.com and log into your account. Then at the bottom click on the RSS link under RSS Syndication of your podcast. When that appears, right click and View Source or "View Page Source" in Firefox. Then save the document to your desktop as whatever.xml. Then go back to your WordPress.org blog and go to Tools > Import (wp-admin/import.php). Select RSS, and then import that newly saved XML file. This will import all your recent blogs from LibSyn.

4. Setup/Adjust LibSyn
Now you want to go back into the back end of your LibSyn account. You can do this by either hitting the back button from yourlibsynusername.libsyn.com/rss or simply logging back into your account. Navigate to Settings and then click on Advanced. Under "opt in" slightly above the RSS feed, enter your feedburner feed (http://feeds.feedburner.com/yourfeedburnerfeed) and select "Redirect yourlibsynusername.libsyn.com/rss to this URL." This will make the transition easier whenever you are ready. Then click SAVE CHANGES at the bottom.

5. Finally Make the Switch
To make the transition happen there is something you have to do within LibSyn. When you are ready to move your feed completely, go back to your LibSyn account, login, go to Settings > Advanced. At the bottom, you want to add the following code in the bottom box labeled "Additional Tags."

[code]<itunes:new-feed-url>http://feeds.feedburner.com/yourfeedburnerfeed</itunes:new-feed-url>[/code]

If you do not wish to use Feedburner, your code will be something like this:

[code]<itunes:new-feed-url>http://newlocation.com/example.rss</itunes:new-feed-url>[/code]

If you use a manual feed and do not want to use Feedburner, WordPress or whatever, you can simply add this code to your old feed anywhere after the 'channel' tag and before the first 'item' tag (obviously not within any other tag). This will replace the URL in iTunes. (See Apple's Docs, Change Podcast Feed Forum, Podcast Forum)

Then click SAVE CHANGES. While I am not sure how long it takes for LibSyn, podPress and iTunes to sync and update, it did it for me in less than an hour with this method; however, Apple and iTunes suggests that you allow 24-48 hours.

Now, if for some reason that your RSS feed does not change, there are some other options and things that you can do. First, you can try the forums above. Second, and I suggest as a last resort, you can contact Apple. If you want to contact Apple, do not make them have to do any work or contact you for any further details. So be as specific and detailed as possible. Always include your Feed ID and URLs involved for their information, even if the problem doesn't relate to a specific feed URL. If the problem is with a podcast that is already in the iTunes Store, include the link to the podcast in the Store (if you don't have it, right-click on the podcast's cover art and choose "Copy iTunes Store URL"). Now you are ready to contact Apple about your podcasts here.

Written by Travis Smith · Categorized: Tutorials

May 14 2010

Posting on Two Different Pages When Using a Static Front Page

On one of my sites using Thesis, I wanted to create the WordPress blog so that I can "blog" on two different pages (in my case I wanted a blog blog and a podcast blog) based on categories with a static home page. So I first go to /wp-admin/options-reading.php and select static page and select my front page (Create New Page called Home) and my posts page (Create New Page called Blog). If you want two different blogs then your post page could be something like Blog1.

Since WordPress defaults to one certain page (the posts page) to be able to have it default to two different pages, we will be using Categories to control which posts go where. For example, blog posts (with multiple categories) to one page and my podcast posts (via podpress, with only 2 categories) to another page (called Podcasts).

I use categories for my blog and have two categories (podcast and something else) that I exclude from my blog (or posts page) and create a custom category page (Thesis Tutorial – Creating Custom Categories - Sugarrae) for podcasts (or you can use custom_functions.php to create a custom page with its own CSS, etc). You can use the Front Page Excluded Categories or Simply Exclude or Front Page Category (inclusion method) plugin if your blog is your front page (which here we are using a static page) or you can refer to the WordPress Functions Reference (Function Reference/query posts WordPress Codex) which tell you how to Exclude Posts Belonging to Only One Category (Show all posts except those from a category by prefixing its ID with a '-' (minus) sign) by using the php code query_posts('cat=-3'); manually.

To remove the Podcasts & Podcasts ShowNotes (categories) posts, I added this code to my custom_functions.php

[php]//exclude category from the posts page
function exclude_category($query) {
if ( $query->is_posts_page) {
$query->set('cat', '-324, -20');
}
return $query;
}

add_filter('pre_get_posts', 'exclude_category'); [/php]

is_posts_page (Function Reference/WP Query WordPress Codex says it is available for wp-query) works! The category IDs (-324, -20) can be found when you go to /wp-admin/categories.php and hover over the category, you will see /wp-admin/categories.php?action=edit&cat_ID=XXX at the bottom (in Firefox), or if you click on the category, you will see this in the URL. You want the cat_ID number. The (-) tells the query to exclude the category. So you would replace my numbers 324 and 20 with your category number(s). If you have only one category, it will look like this: $query->set('cat', '-XXX'); but if you have two it will look like this:$query->set('cat', '-XXX, -XXX'); and if you have three it will look like this: $query->set('cat', '-XXX, -XXX, -XXX');.

This creates the Blog posts correctly. Now to create the second one, there are two methods: (1) Custom Category Page (see Sugarrae's Creating Custom Categories) or (2) Custom Page (see DIY's Custom Page tutorial). The easier option is to use the custom categories (usually renders a url of domain.com/category/podcasts/), but the sweeter way is the Custom Page.

I hope this helps!

Written by Travis Smith · Categorized: WordPress

May 10 2010

The Best Security Plugins for WordPress

Security should be everyone's number one priority. This needs to be determined from the outset, and with WordPress's growing popularity you can expect more and more hacks/hackers. If you have not heard already there are a few hacks already spreading through the WordPress community. However, there are plugins that can help patch up the WordPress CMS to help.

My favorites have been (not all are WordPress 3.0 compatible) and are:

  1. Admin Log (Download, Directory): Displays a list of all the admin pages accessed in the Blog admin area. This is updated every time a page in the admin area is accessed. Information displayed includes: admin page accessed, user, and time of access. However, this should be filtered better because it’s keeping some access pages that are unnecessary at all.
  2. Admin SSL (Download, Directoy): This administrator security plugin is very helpful to protect the admin pages, posts, secured logins, supports all SSL setups and encrypted cookie content. This plugin is compatible on wordpress 2.3-2.7 versions only.
  3. Akismet: This is a standard spam application that comes with WordPress by default. Be sure to set this up and have this running almost immediately.
  4. Angsuman's WordPress Guard Plugin (Download): This plugin adds Double Security For WordPress Administrator Panel, Protection over wp-admin directory, and Protection Against Future Vulnerabilities. Adding password protection to /wp-admin/ adds a 2nd layer of protection around your blog's admin area, login, and files. This forces an attacker or bot to attack this 2nd layer of protection instead of your actual admin files. This dramatically increases your security
  5. Authenticated WordPress (Download): The free Authenticated WordPress Plugin (compatible with all versions of WordPress) makes your blog content (posts, pages, categories etc.) accessible to registered users only. This allows you to display content to your users in a controlled fashion. It also allows private blogging i.e. makes your blog accessible to selected people only (like family and/or friends and/or business associates).
  6. Anonymous WordPress Plugin (Download, Directory): All the WordPress versions 2.3 and above have the feature to get automatic updates for plugins. During this process it will send some of your information like your blog’s URL, version number, list of installed plugins and activated plugins to WordPress.org. This information could be of potential use for hackers. So to avoid this, installing Anonymous WordPress plug-in is a feasible option. It will strip off your blog’s URL and version number and empty the activated plugins list. This plug-in is compatible with WordPress 2.3 and above.
  7. AskApache Password Protect (Download, Directory): It will block the bots and creates a safe wall for any vulnerability your WordPress blog may have. It will protect your password as well as your WordPress directories like the wp admin-directory, wp-includes, wp-content, including plugins. This protects your Admin-panel with a powerful htaccess protection, preventing all spambots and unwanted users to access you site. It provides you complete control over your site from both sides.
  8. Blogsecurify (Download): Forces users to login over a secure communication channel (SSL). This is similar in functionality to Force SSL plugin. As with Force SSL, it requires your server to have SSL enabled which also means it needs a SSL server certificate which doesn't come cheap and is a recurring expense.
  9. Chap Secure Login (Download): If you are not having a secure connection like SSL to protect your password, then you can use this plug-in for encrypting passwords. It will use the Chap protocol to hide the passwords and transmit it encrypted. The only information that is transmitted unencrypted is your username. Protecting password will give full security because password leaks will enable the hacker the gain full control of your WordPress blog.
  10. Database Backups: There are two that I use with this and I don't know which I prefer quite yet. WP-DB-Backup (Download, Directory) is a WordPress specific plugin that creates backups of your core WordPress tables as well as other tables of your choice in the same database. The content can be backedup at your HDD, email, domain space. You can restore the entire database with the same greatness if it is accidentally deleted or deleted by other hackers. This is the must have Plugin for your wordpress. Backupify is a social/web 2.0 backup system that can backup Facebook, Twitter, Flickr, Picasa, PhotoBucket, Delicious, Hotmail, Friendfeed, Basecamp, Zoho, Blogger, WordPress, and Google Apps.
  11. Force SSL (Download, Directory): For those will an SSL certificate, this plugin forces an HTTPS connection for security purposes. Force SSL simply redirects requests made via regular old http to requests for trusty new https, the SSL connection (secure connection).
  12. Invisible Defender (Download, Directory): This anti-sypbot plugin protects the registration, login and comment forms from spambots by adding the 2 extra fields that were hidden by CSS (cascading style sheet). This shows the number of blocked spammers in your Dashboard.
  13. Login Encrypt (Download, Directory): This will help encrypt the login information using the complex DES and RSA combination. It uses the JavaScript appended and encrypted the password of the user and generates a unique DES key. And by using this key, user can have secure login each time they login to your blog.
  14. Login Lockdown (Download, Directory): This records the IP address and time-stamp of every failed login. If certain login failure attempts were made from same IP range in certain period of time, it will disable all the requests from that range, which may also include yourself.
  15. Replace WP-Version (Download, Directory, German Homepage): Secure your WordPress installation and eliminate or replace your wp-version and database-version on easy way with a small plugin.
  16. Secure Files (Download): This plugin allows you to upload and download files from outside of your web document root for security purposes. It can be used to can restrict file downloads to users that are logged in, or have a certain user level.
  17. Secure WP (Download, Directory, German Homepage): It will help secure WordPress installation by removing miscellaneous items after the installation process which may aid hackers, such as your login pages, forums, adds index.html to plugin directory, removes wp-version except in admin-panel. Secure WordPress will add a blank index.html to the plug-in directory such that if anyone is trying to view the contents of the directory they will be viewing a blank page instead of the contents.
  18. Semisecure Login (Download, Directory): This increases the security of your WordPress login. This uses client-side MD5 encryption on password when the user log-ins. But many of the users neglect it, if they are using ForceSSL or AdminSSL.
  19. Theme Authenticity Checker (Directory): Scan all of your theme files for potentially malicious or unwanted code. This is a helpful plugin for you to check any theme you download somewhere to make sure the theme is safe for using.
  20. WordPress File Monitor (Download, Directory): Monitors your WordPress installation for editing/adding/deleting files. When a change is detected an email alert can be sent to a specified address. It also has ability to record the time-stamp of one of the above 3 modifications.
  21. WP-Ban (Directory): Wp-Ban bans users by IP, IP Range, host name, user agent and referer url from visiting your WordPress’s blog. It will display a custom ban message when the banned IP, IP range, host name, user agent or referer url tries to visit you blog. You can also exclude certain IPs from being banned. There will be statistics recordered on how many times they attemp to visit your blog. It allows wildcard matching too.
  22. wp-dephorm (Download, Directory): wp-dephorm protects your users from the prying eyes of phorm. This is achieved by setting a cookie to opt out of the phorm information mining. Your blog viewers will not have there information stored and used in marketing campaigns whilst viewing your site
  23. WP-Security Scan (Download, Directory): Semper Fi Web Design probably has one of the best security plugins available. Scans your WordPress installation for security vulnerabilities and suggests corrective actions regarding: passwords, file permissions, database security, version hiding, and WordPress admin protection/security.
  24. WP-SpamFree (Download): An extremely powerful anti-spam plugin for WordPress that eliminates comment spam, including trackback and pingback spam. It works invisibly without CAPTCHA’s, or other inconvenience to site visitors. The plugin includes spam-free contact form feature as well.

Now I do not use all of these plugins, or even half of these. However, there are some essential security items that must be addressed. The plugins that I use on every site are: Akismet, WP-DB-Backup (and/or Backupify), Login Lockdown, Secure WordPress (or Secure WP), and CHAP Secure Login or Semisecure Login or Login Encrypt.

There is one more that is in beta and is only by invitation, and that is WP-Security. More information forthcoming.

Written by Travis Smith · Categorized: WordPress

  • « Previous Page
  • 1
  • …
  • 57
  • 58
  • 59
  • 60
  • 61
  • Next Page »
  • Twitter
  • Facebook
  • LinkedIn
  • Google+
  • RSS

Copyright © 2025 ďż˝ WP Smith on Genesis on Genesis Framework ďż˝ WordPress ďż˝ Log in