WP Smith

Creating WordPress & Genesis Websites Since 2010

  • Home
  • About
  • Services
  • Blog
  • Contact

May 06 2010

Remove “Powered by podPress” in the Footer

If you want to remove the podPress footer from your theme, you have a couple options. First, the simplest is to check under Podpress > General Settings, and the last checkbox has to do with Credit. Simply uncheck it to remove it from your footer (unless you want everyone to know who/what made everything so bad [as they say in their admin section]).

If you have Thesis, you can add this to your custom functions.php file:

[php]function remove_podpress_footer () {
remove_action('wp_footer','podPress_wp_footer');
}
add_action('wp_footer','remove_podpress_footer', 9);[/php]

Placing the 9 (or even an 8) ensures that this code runs before that of Podpress’s code since the default is 10 (thanks to Henrik Melin and his post).

However, if you are not using Thesis/Genesis, must do this inside the plugin, besides buying one of these frameworks, you want to open the plugins editor to edit podpress/podpress.php and find the code that looks like this:

[php]    function podPress_wp_footer() {
GLOBAL $podPress, $podPress_inAdmin;
if(!$podPress_inAdmin) {
if(!$podPress->settings['compatibilityChecks']['themeTested']) {
$podPress->settings['compatibilityChecks']['themeTested'] = true;
podPress_update_option('podPress_config', $podPress->settings);
}
}
if(!$podPress_inAdmin) {
if(!$podPress->settings['compatibilityChecks']['wp_footer']) {
$podPress->settings['compatibilityChecks']['wp_footer'] = true;
podPress_update_option('podPress_config', $podPress->settings);
} else {
$podPress->settings['compatibilityChecks']['wp_footer'] = true;
}
}

if($podPress->settings['enableFooter']) {
$diplay = 'block';
} else {
$diplay = 'none';
}
echo '<div id="podPress_footer" style="display: '.$diplay.'; text-align: center;"><cite>'.__('Podcast Powered by ', 'podpress').'<a href="http://www.mightyseek.com/podpress/" title="podPress, '.__('the dream plugin for podcasting with WordPress', 'podpress').'"><strong>podPress (v'.PODPRESS_VERSION.')</strong></a></cite></div>';
}[/php]

And you want to comment out this section by adding /* at the beginning and */ at the end, so that:

[php]/* function podPress_wp_footer() {
GLOBAL $podPress, $podPress_inAdmin;
if(!$podPress_inAdmin) {
if(!$podPress->settings['compatibilityChecks']['themeTested']) {
$podPress->settings['compatibilityChecks']['themeTested'] = true;
podPress_update_option('podPress_config', $podPress->settings);
}
}
if(!$podPress_inAdmin) {
if(!$podPress->settings['compatibilityChecks']['wp_footer']) {
$podPress->settings['compatibilityChecks']['wp_footer'] = true;
podPress_update_option('podPress_config', $podPress->settings);
} else {
$podPress->settings['compatibilityChecks']['wp_footer'] = true;
}
}

if($podPress->settings['enableFooter']) {
$diplay = 'block';
} else {
$diplay = 'none';
}
echo '<div id="podPress_footer" style="display: '.$diplay.'; text-align: center;"><cite>'.__('Podcast Powered by ', 'podpress').'<a href="http://www.mightyseek.com/podpress/" title="podPress, '.__('the dream plugin for podcasting with WordPress', 'podpress').'"><strong>podPress (v'.PODPRESS_VERSION.')</strong></a></cite></div>';
}*/[/php]

Then you want to find the following code

[php]add_action('wp_footer', 'podPress_wp_footer');[/php]

and comment it out so that:

[php]/*add_action('wp_footer', 'podPress_wp_footer');*/[/php]
Written by Travis Smith · Categorized: Tutorials

Apr 17 2010

The Best Administrator Plugins for WordPress

I use a lot of plugins though many times I wish I had the time to work them into my core files. However, over time I have figured out what plugins I absolutely love. So what do I mean by Administrator plugins? These are plugins that help the Administrator create, organize, and even operate the site or blog. Typically, these are some of the first plugins that I install, and while the results can be seen on the other side, these plugins are primarily for the admin. I did not include the security or SEO plugins as I will write separate posts on those at a later time.

  1. Admin Management Xtended: This plugin allows the admin to  to be able to manage contents easily and quickly, especially important those who are using WordPress as a CMS. This plugin has a video demo as well.
  2. Broken Link Checker: There is nothing worse than having dead links or no images. This plugin helps you ensure that none of your links are dead, pictures go missing, or frustrate your readers. It lets you know on the WordPress Dashboard how many dead links that you have that need attention. One of the practices I started doing was if I referred to a page that served as a source for a content article, I would make a PDF of that article and store it on my site, so when the site takes down the article and/or the moved it somewhere, you have an easy place to refer people that ensures that people can see the content.
  3. Digital Fingerprint: No one likes their stuff taken, but how do you know if it is or not? This plugin solves that for you. "This plugin helps blog owners stay vigilant against unauthorized content use by the overwhelming majority of blogs that are splogs," who steal your content!
  4. Gravity Forms: This is a premium plugin that is well worth the money because of the time it saves you. Previously I used plugins like cforms that were rather cumbersome. However, Gravity Forms allows you to create all sorts of forms including forms that turn into post drafts!
  5. My Category Order & My Page Order: One thing that I dislike about WordPress postings was the ranking number. I simply wanted to write, create, etc, and then go back and re-order easily. My Category Order and My Page Order allow just that. It uses a drag and drop interface that is simple and easy.
  6. Ozh Admin Drop Down Menu: This plugin is probably my most favorite admin plugin. One thing I absolutely dispised about WordPress was the lack of space to write posts, etc. This plugin moves the left menu system and replaces it with a drop down menu system, which means more horizontal space below! For small monitors, this is a dream come true.
  7. Widget Logic: This plugin is a bit more technical; however, it allows for much more customization. Many taut this as the best plugin for sidebar customization. Widget Logic allows widgets to appear or not depending on standard WP conditional tags, such as is_home() and is_single() and so on.
  8. Widgets Reloaded: Widgets Reloaded replaces many of the default widgets with versions that allow much more control. Widgets come with highly customizable control panels. Each widget (archives, authors, bookmarks/links, calendar, categories, pages, search, tags) can also be used any number of times.
  9. WordPress Navigation List (NAVT): This is also another favorite plugin of mine. This powerful tool is designed to provide you with complete control over the creation, styling and contents of your web site's navigation. The plugin gives you the ability to create unique site navigation from your pages, categories and users using a Drag 'n Drop Interface; arrange the items within a group in any arbitrary order. It requires the use of Javascript, so ensure that it is turned on.  However, be careful if you operate more than one website using this plugin as I have lost a few menu systems that way. Previous to this, I used Multi-level navigation plugin.
  10. Permalink Plugins: Personally, I don't really care to much for the use of these; however, I always install one of the following, just in case I do eventually have the use of one of these. The two best permalink plugins are: Advanced Permalinks and Custom Permalinks. It personally doesn't matter which one I use as I have found not much difference between the two functionally. However, if I were to choose, I would choose the Advanced Permalinks but I could be easily persuaded to encourage the use of the other as well.
  11. Embed iFrame: This will let you embed iframe - an HTML tag that allows a webpage to be displayed inline with the current page, in a WordPress post. Although an iframe can lead to a complicated website, it can be very effective when used appropriately. So if you wish to have an Amazon store on your WordPress site, you can, but you must use this plugin.
  12. Search Meter: This plugin helps you keep your blog focused on what your visitors want to read. It does this by keeping track of what your visitors are searching for. If you have a Search box on your blog, Search Meter automatically records what people are searching for — and whether they are finding what they are looking for. So it is an excellent plugin to help you come up with more blog posts or even to know which ones to edit (copywrite) so that they appear in the search box.

Written by Travis Smith · Categorized: WordPress

Apr 16 2010

Remove or Replace “Blog Comments Powered by DISQUS”

This line of code that you are wanting to hide is:
[html]<a href="http://disqus.com" class="dsq-brlink">blog comments powered by <span class="logo-disqus">Disqus</span></a>[/html]

There are two ways to hide this: CSS & php. In CSS, just go to your DISQUS CSS file located in COMMENTS > DISQUS > SETTINGS > APPEARANCE and add
[html].dsq-brlink {display:none;}
.logo-disqus {display:none;}[/html]

Or, if you wish to edit the file in WordPress, which is typically not advisable, especially if you do not have access via FTP to your files as a change may render your site inoperable. So with that caution,  go under Plugins and select Editor. Where it says, "Select what plugin to edit," you want to select Disqus Comment System. Then click Select. Then you want to select the disqus-comment-system/comments.php file on the right side, which should be located at the bottom. If you do this through a FTP and you are using a folder system (where each plugin is located in its own folder), simply navigate to your plugins directory, typically /yourdomainrootfolder/wp-content/plugins/disqus-comment-system/comments.php is the file that you want to get.

At line 30 you will find:

[html] <a href="http://disqus.com">blog comments powered by <span>Disqus</span></a> [/html]

Simply delete the entire line, or write whatever you'd like to write there.

Written by Travis Smith · Categorized: Tutorials

Apr 08 2010

How to Remove the Borders in Thesis 1.7

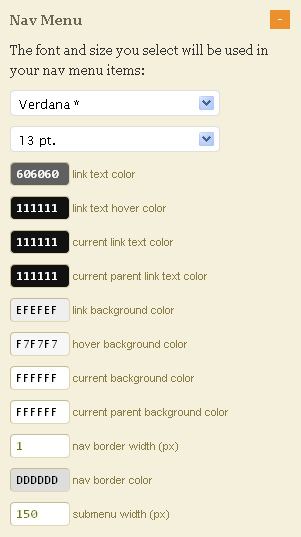
thesis borders
Click for Larger Image

If you do not wish to have any borders in your Thesis layout, one method would be to edit the custom.css file to make this happen. However, Thesis does have the user-friendly ability to remove these things as well. There are two things that you must do.

  1. Remove the Navigation Menu border.
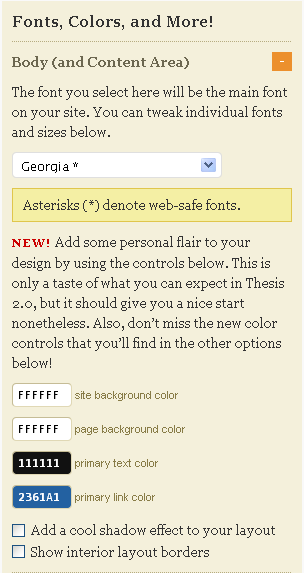
  2. Remove the Interior borders.

To remove the navigation menu border, under Thesis Design Options, which is located under Thesis > Design Options, expand the Nav Menu section at the top left. Scroll until you can see "nav border width (px)." Change the default 1 to 0 (zero).

To remove the interior borders, under Thesis Design

thesis borders
Click for Larger Image
Options, which is located under Thesis > Design Options, expand the Body (and Content Area) section at the top left. Scroll until you can see "Show interior layout borders," which is the last option in the section. Uncheck that option.

Written by Travis Smith · Categorized: Tutorials

Apr 07 2010

Flash Video Hiding My CSS Navigation Menu

In one of the sites I was working, I moved the Thesis navigation menu below the imaged header. However, I had a video in the Multimedia Box and the CSS Navigation Menu was dropping below the flash video. Problem! So how do we fix this?

The typical embed code of a flash video from Vimeo (or YouTube, etc) is:

[html] <object width="400" height="225">
<param name="allowfullscreen" value="true" />
<param name="allowscriptaccess" value="always" />
<param name="movie" value="http://vimeo.com/moogaloop.swf?clip_id=9188712&amp;server=vimeo.com&amp;show_title=1&amp;show_byline=1&amp;show_portrait=0&amp;color=&amp;fullscreen=1" />
<embed src="http://vimeo.com/moogaloop.swf?clip_id=9188712&amp;server=vimeo.com&amp;show_title=1&amp;show_byline=1&amp;show_portrait=0&amp;color=&amp;fullscreen=1" type="application/x-shockwave-flash" allowfullscreen="true" allowscriptaccess="always" width="400" height="225"></embed></object>[/html]

So, after the <object> tag, but before the <embed> tag, you need to add another <param> tag.

[html]<param name="wmode" value="transparent" />[/html]

And then you need to add within the <embed> tag, wmode="transparent" so that the new embed code says:

[html highlight="3,6"] <object width="400" height="225">
<param name="allowfullscreen" value="true" />
<param name="wmode" value="transparent" />
<param name="allowscriptaccess" value="always" />
<param name="movie" value="http://vimeo.com/moogaloop.swf?clip_id=9188712&amp;server=vimeo.com&amp;show_title=1&amp;show_byline=1&amp;show_portrait=0&amp;color=&amp;fullscreen=1" />
<embed src="http://vimeo.com/moogaloop.swf?clip_id=9188712&amp;server=vimeo.com&amp;show_title=1&amp;show_byline=1&amp;show_portrait=0&amp;color=&amp;fullscreen=1" type="application/x-shockwave-flash" allowfullscreen="true" allowscriptaccess="always" wmode="transparent" width="400" height="225"></embed></object>[/html]

So, that fixes most if not all of the problems (for more information on wmode, see Adobe). If it does not fix the problem, you will need to add z-index: 0; to the CSS containing the flash video and z-index: 99; (99 is an arbitrary number as any number > O can fit here) to the menu system (for further information on the z-index property). If you are using thesis, this code goes into your custom.css. Here is the code that I added (which is probably a little overboard as I believe the .custom .menu portion is not necessary):

[css].custom .image_box {z-index:1;}, .custom_box { border-style: solid; border-color: #ddd; z-index:1;}
.custom #image_box img { background: #fff; border-style: solid; border-color: #bbb; z-index:1;}
.custom .menu ul, .custom .menu ul li { z-index:99; }
.custom .menu ul ul, .custom .menu :hover ul :hover ul { z-index:99; }
.custom .menu li:hover ul, .custom .menu a:hover ul { z-index:99; }
.custom .menu { z-index:99; }
[/css]

So I have eventually landed on just this CSS code:

[css].custom .image_box {z-index:1;}, .custom_box { border-style: solid; border-color: #ddd; z-index:1;}
.custom #image_box img { background: #fff; border-style: solid; border-color: #bbb; z-index:1;}
[/css]

Written by Travis Smith · Categorized: Tutorials

  • « Previous Page
  • 1
  • …
  • 58
  • 59
  • 60
  • 61
  • Next Page »
  • Twitter
  • Facebook
  • LinkedIn
  • Google+
  • RSS

Copyright © 2025 � WP Smith on Genesis on Genesis Framework � WordPress � Log in