WP Smith

Creating WordPress & Genesis Websites Since 2010

  • Home
  • About
  • Services
  • Blog
  • Contact

Dec 20 2011

Gravity Forms Field Settings

In my other post on How to Create a Custom Button in Gravity Forms with a Terms of Service Button Example, I mentioned the very important hook: gform_editor_js. However, what are the various field settings used for the various buttons?

So to get your custom field to have its property placement fields appear you will need to do something like this:
[php]
// Now we execute some javascript technicalities for the field to load correctly
add_action( "gform_editor_js", "wps_gform_editor_js" );
function wps_gform_editor_js(){
?>

<script type='text/javascript'>

jQuery(document).ready(function($) {
// from forms.js; can add custom "tos_setting" as well
fieldSettings["my-custom-field"] = ".label_setting, .description_setting, .admin_label_setting, .size_setting, .default_value_textarea_setting, .error_message_setting, .css_class_setting, .visibility_setting, .tos_setting"; //this will show all the fields of the Paragraph Text field minus a couple that I didn't want to appear.
});

</script>
<?php
}
[/php]

You can also add the fields based on field type:
[php]
// Now we execute some javascript technicalitites for the field to load correctly
add_action( "gform_editor_js", "wps_gform_editor_js" );
function wps_gform_editor_js(){
?>

<script type='text/javascript'>

jQuery(document).ready(function($) {
// from forms.js; can add custom "tos_setting" as well
fieldSettings["my-custom-field"] = fieldSettings["textarea"];
});

</script>
<?php
}
[/php]

And finally can also add the fields based on field type, plus whatever custom field placements:
[php]
// Now we execute some javascript technicalitites for the field to load correctly
add_action( "gform_editor_js", "wps_gform_editor_js" );
function wps_gform_editor_js(){
?>

<script type='text/javascript'>

jQuery(document).ready(function($) {
// from forms.js; can add custom "tos_setting" as well
fieldSettings["my-custom-field"] = fieldSettings["textarea"] + ", .my_custom_setting";
});

</script>
<?php
}
[/php]

Click to reveal ALL the [expand title="Field Settings"]

  • address: .conditional_logic_field_setting, .prepopulate_field_setting, .error_message_setting, .label_setting, .admin_label_setting, .address_setting, .rules_setting, .description_setting, .visibility_setting, .css_class_setting,
  • captcha: .captcha_type_setting, .captcha_size_setting, .captcha_fg_setting, .captcha_bg_setting, .conditional_logic_field_setting, .captcha_language_setting, .captcha_theme_setting, .error_message_setting, .label_setting, .description_setting, .css_class_setting,
  • checkbox: .conditional_logic_field_setting, .prepopulate_field_setting, .error_message_setting, .label_setting, .admin_label_setting, .choices_setting, .rules_setting, .visibility_setting, .description_setting, .css_class_setting,
  • date: .conditional_logic_field_setting, .prepopulate_field_setting, .error_message_setting, .label_setting, .admin_label_setting, .rules_setting, .date_input_type_setting, .duplicate_setting, .visibility_setting, .date_format_setting, .default_value_setting, .description_setting, .css_class_setting,
  • donation : .conditional_logic_field_setting, .donation_field_type_setting, .prepopulate_field_setting, .error_message_setting, .label_setting, .admin_label_setting, .rules_setting, .default_value_setting, .description_setting, .css_class_setting,
  • email: .conditional_logic_field_setting, .prepopulate_field_setting, .error_message_setting, .label_setting, .email_confirm_setting, .admin_label_setting, .size_setting, .rules_setting, .visibility_setting, .duplicate_setting, .default_value_setting, .description_setting, .css_class_setting,
  • fileupload: .conditional_logic_field_setting, .error_message_setting, .label_setting, .admin_label_setting, .rules_setting, .file_extensions_setting, .visibility_setting, .description_setting, .css_class_setting,
  • hidden: .prepopulate_field_setting, .label_setting, .default_value_setting,
  • html: .label_setting, .content_setting, .conditional_logic_field_setting, .disable_margins_setting, .css_class_setting,
  • name: .conditional_logic_field_setting, .prepopulate_field_setting, .error_message_setting, .label_setting, .admin_label_setting, .name_format_setting, .rules_setting, .visibility_setting, .description_setting, .css_class_setting,
  • number: .conditional_logic_field_setting, .prepopulate_field_setting, .error_message_setting, .label_setting, .admin_label_setting, .size_setting, .range_setting, .rules_setting, .visibility_setting, .duplicate_setting, .default_value_setting, .description_setting, .css_class_setting,
  • option : .product_field_setting, .option_field_type_setting, .conditional_logic_field_setting, .prepopulate_field_setting, .label_setting, .admin_label_setting, .default_value_setting, .description_setting, .css_class_setting,
  • page: .next_button_setting, .previous_button_setting, .css_class_setting, .conditional_logic_page_setting, .conditional_logic_nextbutton_setting,
  • password: .conditional_logic_field_setting, .error_message_setting, .label_setting, .admin_label_setting, .rules_setting, .duplicate_setting, .description_setting, .css_class_setting, .password_strength_setting
  • phone: .conditional_logic_field_setting, .prepopulate_field_setting, .error_message_setting, .label_setting, .admin_label_setting, .rules_setting, .duplicate_setting, .visibility_setting, .default_value_setting, .description_setting, .phone_format_setting, .css_class_setting,
  • post_category: .conditional_logic_field_setting, .prepopulate_field_setting, .error_message_setting, .admin_label_setting, .post_category_checkbox_setting, .post_category_initial_item_setting, .label_setting, .size_setting, .rules_setting, .visibility_setting, .duplicate_setting, .description_setting, .css_class_setting,
  • post_content: .conditional_logic_field_setting, .prepopulate_field_setting, .error_message_setting, .admin_label_setting, .maxlen_setting, .post_content_template_setting, .post_status_setting, .post_category_setting, .post_author_setting, .label_setting, .size_setting, .rules_setting, .visibility_setting, .default_value_textarea_setting, .description_setting, .css_class_setting,
  • post_custom_field: .conditional_logic_field_setting, .prepopulate_field_setting, .error_message_setting, .post_custom_field_setting, .post_custom_field_type_setting, .label_setting, .size_setting, .rules_setting, .visibility_setting, .duplicate_setting, .default_value_setting, .description_setting, .css_class_setting,
  • post_excerpt: .conditional_logic_field_setting, .prepopulate_field_setting, .error_message_setting, .admin_label_setting, .maxlen_setting, .post_status_setting, .post_category_setting, .post_author_setting, .label_setting, .size_setting, .rules_setting, .visibility_setting, .default_value_textarea_setting, .description_setting, .css_class_setting,
  • post_image: .conditional_logic_field_setting, .error_message_setting, .admin_label_setting, .post_image_setting, .label_setting, .rules_setting, .description_setting, .css_class_setting,
  • post_tags: .conditional_logic_field_setting, .prepopulate_field_setting, .error_message_setting, .admin_label_setting, .label_setting, .post_tag_type_setting, .size_setting, .rules_setting, .visibility_setting, .default_value_setting, .description_setting, .css_class_setting,
  • post_title: .conditional_logic_field_setting, .prepopulate_field_setting, .error_message_setting, .admin_label_setting, .post_title_template_setting, .post_status_setting, .post_category_setting, .post_author_setting, .label_setting, .size_setting, .rules_setting, .visibility_setting, .default_value_setting, .description_setting, .css_class_setting,
  • price: .rules_setting, .duplicate_setting,
  • product: .product_field_type_setting, .conditional_logic_field_setting, .prepopulate_field_setting, .label_setting, .admin_label_setting, .description_setting, .css_class_setting,
  • quantity : .product_field_setting, .quantity_field_type_setting, .conditional_logic_field_setting, .prepopulate_field_setting, .label_setting, .admin_label_setting, .default_value_setting, .description_setting, .css_class_setting,
  • radio: .conditional_logic_field_setting, .prepopulate_field_setting, .error_message_setting, .label_setting, .admin_label_setting, .choices_setting, .rules_setting, .visibility_setting, .duplicate_setting, .description_setting, .css_class_setting,
  • section: .conditional_logic_field_setting, .label_setting, .description_setting, .visibility_setting, .css_class_setting,
  • select: .conditional_logic_field_setting, .prepopulate_field_setting, .error_message_setting, .label_setting, .admin_label_setting, .size_setting, .choices_setting, .rules_setting,.duplicate_setting, .visibility_setting, .description_setting, .css_class_setting,
  • shipping: .shipping_field_type_setting, .conditional_logic_field_setting, .prepopulate_field_setting, .label_setting, .admin_label_setting, .description_setting, .css_class_setting,
  • singleproduct: .base_price_setting, .disable_quantity_setting, .rules_setting, .duplicate_setting,
  • singleshipping: .base_price_setting,
  • text: .conditional_logic_field_setting, .prepopulate_field_setting, .error_message_setting, .label_setting, .admin_label_setting, .size_setting, .maxlen_setting, .password_field_setting, .rules_setting, .visibility_setting, .duplicate_setting, .default_value_setting, .description_setting, .css_class_setting,
  • textarea: .conditional_logic_field_setting, .prepopulate_field_setting, .error_message_setting, .label_setting, .admin_label_setting, .maxlen_setting, .size_setting, .rules_setting, .visibility_setting, .duplicate_setting, .default_value_textarea_setting, .description_setting, .css_class_setting,
  • time: .conditional_logic_field_setting, .prepopulate_field_setting, .error_message_setting, .label_setting, .admin_label_setting, .rules_setting, .duplicate_setting, .visibility_setting, .description_setting, .css_class_setting,
  • total: .conditional_logic_field_setting, .label_setting, .admin_label_setting, .description_setting, .css_class_setting,
  • website: .conditional_logic_field_setting, .prepopulate_field_setting, .error_message_setting, .label_setting, .admin_label_setting, .size_setting, .rules_setting, .visibility_setting, .duplicate_setting, .default_value_setting, .description_setting, .css_class_setting,

[/expand]
Written by Travis Smith · Categorized: Plugins

Dec 20 2011

How to Create a Custom Form Field in Gravity Forms with a Terms of Service Form Field Example

First and foremost, RocketGenius has, in my opinion, the best form creation plugin in the WordPress market, GravityForms. It seriously is worth every penny and probably is the best money I've spent. I see so much potential with Gravity Forms that has yet to be tapped, and I am excited to see new things from GravityForms and the GravityForms community.

GravityForms has made major strides this past year in their documentation. With their recent and ever-expanding hooks and filters, the ability to expand Gravity Forms is becoming limitless. If it doesn't do something that you want, with its current set of filters and hooks, you can easily code it to make it possible.

So recently, I needed to create a Terms of Service custom Gravity Forms field. This TOS field would be a read-only input box with a scrollbar disabling the submit button (as an option, even), so when the user scrolled to the bottom, it would enable the submit button.

Here are the steps that I've taken:

  1. Add the Button
  2. Add the Field Title
  3. Add the Input Field
  4. Add the Editor Form JS
  5. Add a Placement Custom Setting
  6. Add a ToolTip
  7. Add my Custom External JS
  8. Optional: Add the Appropriate CSS Classes

Add the Button

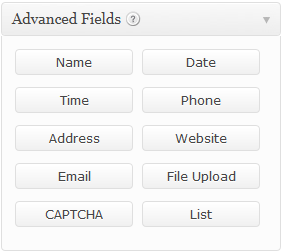
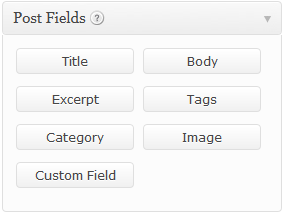
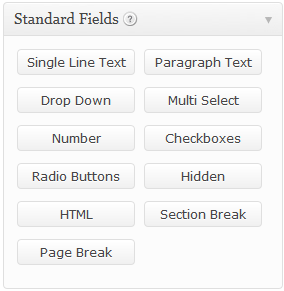
You will first need to hook into the gform_add_field_buttons. There are three Field Groups where you can add your button:

  1. Standard Fields
  2. Advanced Fields
  3. Post Fields

Gravity Forms Standard FieldsGravity Forms Advanced Fields

Also each button will need three things:

  1. Class
  2. Value (or Name)
  3. Onclick Action

So let's look at the function:

[php]
// Add a custom field button to the advanced to the field editor
add_filter( 'gform_add_field_buttons', 'wps_add_tos_field' );
function wps_add_tos_field( $field_groups ) {
foreach( $field_groups as &$group ){
if( $group["name"] == "advanced_fields" ){ // to add to the Advanced Fields
//if( $group["name"] == "standard_fields" ){ // to add to the Standard Fields
//if( $group["name"] == "post_fields" ){ // to add to the Standard Fields
$group["fields"][] = array(
"class"=>"button",
"value" => __("Terms of Service", "gravityforms"),
"onclick" => "StartAddField('tos');"
);
break;
}
}
return $field_groups;
}
[/php]

In the $group['fields'] array, in value, I used the 'gravityforms' text domain. Right? Wrong? or Indifferent? This can easily be changed to your theme's or child theme's text domain, since Gravity Forms more than likely won't have that string translated.

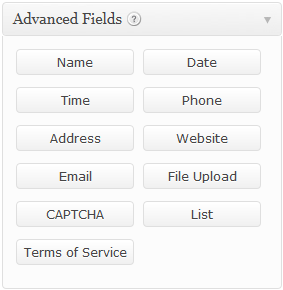
The most important thing here for me, and the things I changed are the value "Terms of Service" in the value key and the arg in the js command StartAddField, 'tos'.

Gravity Forms Advanced Fields with Custom Terms of Service

Add the Field Title

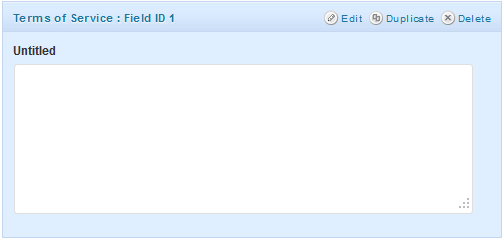
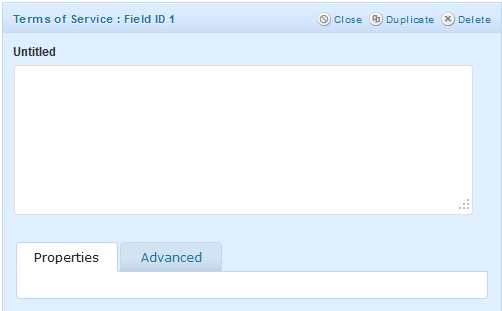
Now that we have our button, we can click on it and a field box with the word Untitled will appear.

However, if you hover over it, only the slug, or the ID, or the type that was given will appear. In my previous bit of code, I gave it the ID, tos.
Gravity Forms TOS Custom Field

However, I do not want the type or the slug to appear, so I want to give it a title. To do this, I will need to hook into the filter gform_field_type_title, which is new in Gravity Forms 1.6. The code is fairly straight forward. I check to see if I have the correct type and then I apply a title.

[php]
// Adds title to GF custom field
add_filter( 'gform_field_type_title' , 'wps_tos_title' );
function wps_tos_title( $type ) {
if ( $type == 'tos' )
return __( 'Terms of Service' , 'gravityforms' );
}
[/php]

Gravity Forms Custom Field with Title

Add the Input Field

This may be one of the most important pieces of adding new Gravity Forms custom fields. To edit the input field, you will need to hook into the gform_field_input (or possibly even the gform_field_content hook). gform_field_input allows you to modify the field's input tag to create custom field types. gform_field_content allows users to completely modify the way the field is rendered including both the input field and label.

This hook has 5 parameters:

  1. $input: The input tag string to be filtered. Will be passed to the hook an empty string value. Return an empty string to bypass the filtering, or change its value to specify a new input tag
  2. $field: This is the Field Object, which contains all the values for the various field settings. The most important key in this object is the $field['type'], which allows you to filter and ensure that you are editing the correct input field.
  3. $value: The pre-populated default/initial value of the field
  4. $lead_id: When executed from the entry detail screen, $lead_id will be populated with the Entry ID. Otherwise, it will be 0
  5. $form_id: The Current Form ID, which will allow you to edit on a form by form basis

[php]
// Adds the input area to the external side
add_action( "gform_field_input" , "wps_tos_field_input", 10, 5 );
function wps_tos_field_input ( $input, $field, $value, $lead_id, $form_id ){

if ( $field["type"] == "tos" ) {
$max_chars = "";
if(!IS_ADMIN && !empty($field["maxLength"]) && is_numeric($field["maxLength"]))
$max_chars = self::get_counter_script($form_id, $field_id, $field["maxLength"]);

$input_name = $form_id .'_' . $field["id"];
$tabindex = GFCommon::get_tabindex();
$css = isset( $field['cssClass'] ) ? $field['cssClass'] : '';
return sprintf("<div class='ginput_container'><textarea readonly name='input_%s' id='%s' class='textarea gform_tos %s' $tabindex rows='10' cols='50'>%s</textarea></div>{$max_chars}", $field["id"], 'tos-'.$field['id'] , $field["type"] . ' ' . esc_attr( $css ) . ' ' . $field['size'] , esc_html($value));

}

return $input;
}
[/php]

First I am checking to make sure I am editing the display of the correct field type. Once that's been determined, I work on the max characters and tab index. Then I added the readonly and the CSS Classes from any custom entered CSS Classes (via cssClass) as well as the Size selection. However, again, this is fairly straightforward. For your custom fields, this will look vastly different. Once complete, your input/checkbox, etc, will appear.
Gravity Forms Custom Field with Textarea

Add the Editor Form JS

Now, probably one of the most important hooks for any new custom field. Without this hook, you won't see anything.
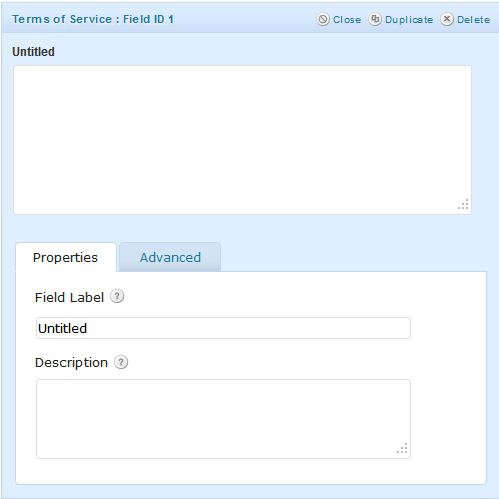
Gravity Forms Properties

So to see the various placement settings under Properties and Advanced you will need to hook into gform_editor_js. This hook will allow you to inject JS into the form editor page.

[php]
// Now we execute some javascript technicalitites for the field to load correctly
add_action( "gform_editor_js", "wps_gform_editor_js" );
function wps_gform_editor_js(){
?>

<script type='text/javascript'>

jQuery(document).ready(function($) {
//Add all textarea settings to the "TOS" field plus custom "tos_setting"
// fieldSettings["tos"] = fieldSettings["textarea"] + ", .tos_setting"; // this will show all fields that Paragraph Text field shows plus my custom setting

// from forms.js; can add custom "tos_setting" as well
fieldSettings["tos"] = ".label_setting, .description_setting, .admin_label_setting, .size_setting, .default_value_textarea_setting, .error_message_setting, .css_class_setting, .visibility_setting, .tos_setting"; //this will show all the fields of the Paragraph Text field minus a couple that I didn't want to appear.

//binding to the load field settings event to initialize the checkbox
$(document).bind("gform_load_field_settings", function(event, field, form){
jQuery("#field_tos").attr("checked", field["field_tos"] == true);
$("#field_tos_value").val(field["tos"]);
});
});

</script>
<?php
}
[/php]

I don't claim to be a jQuery/javascript person. Never have and probably never will. However, I do know from what this bit of code does, two things: (1) You must set your custom settings (i.e., fieldSettings["tos"]), or nothing appears. This can take all the fields of another setting or a comma-separated string of settings. Also note that these are class names. and (2) You want to hook into gform_load_field_settings for any custom placement fields. The documentation for gform_editor_js isn't that great but if you look at gform_field_advanced_settings or gform_field_standard_settings you will see other examples of this hook in action.

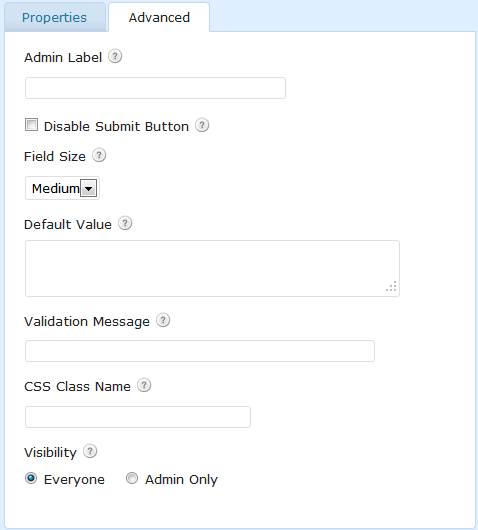
Gravity Forms Advanced Fields

Add a Placement Custom Setting

Now, with custom settings, you will want, even need, to add custom placement input fields. To do this you will need to hook into one of two hooks (gform_field_advanced_settings or gform_field_standard_settings), depending on where you want the custom placement input field.

Since I wanted to add my custom placement field to the Advanced Settings, I am hooking into gform_field_advanced_settings. In this example, I am adding a checkbox placement.

[php]
// Add a custom setting to the tos advanced field
add_action( "gform_field_advanced_settings" , "wps_tos_settings" , 10, 2 );
function wps_tos_settings( $position, $form_id ){

// Create settings on position 50 (right after Field Label)
if( $position == 50 ){
?>

<li class="tos_setting field_setting">

<input type="checkbox" id="field_tos" onclick="SetFieldProperty('field_tos', this.checked);" />
<label for="field_tos" class="inline">
<?php _e("Disable Submit Button", "gravityforms"); ?>
<?php gform_tooltip("form_field_tos"); ?>
</label>

</li>
<?php
}
}
[/php]

While I did not use this, here is another example of

Gravity Forms Advanced Custom Setting

Now both gform_field_standard_settings and gform_field_advanced_settings have various positions to hook into, which will determine the placement of the custom setting. So you can use various positions to determine which position you should place yours. For your information, here is the order/position for the [expand title="Standard Settings"]

  1. label_setting
  2. product_field_setting
  3. shipping_field_type_setting
  4. base_price_setting
  5. disable_quantity_setting
  6. option_field_type_setting
  7. donation_field_type_setting
  8. quantity_field_type_setting
  9. content_setting
  10. next_button_setting
  11. previous_button_setting
  12. disable_margins_setting
  13. post_custom_field_type_setting
  14. post_tage_type_setting
  15. captcha_theme_setting
  16. post_custom_field_setting
  17. post_status_setting
  18. post_author_setting
  19. post_category_setting
  20. post_category_checkbox_setting
  21. post_category_initial_item_setting
  22. gfield_post_category_initial_item_containter
  23. post_content_template_setting
  24. post_tite_template_setting
  25. customfield_content_template_setting
  26. post_image_setting
  27. post_image_featured_image
  28. address_setting
  29. name_format_setting
  30. date_input_type_setting
  31. date_format_setting
  32. file_extensions_setting
  33. columns_setting
  34. max_rows_setting
  35. time_format_setting
  36. phone_format_setting
  37. choices_setting
  38. other_choice_setting
  39. email_confirm_setting
  40. password_strength_setting
  41. enable_enhanced_ui_setting
  42. gfield_min_strength_containter
  43. number_format_setting
  44. description_setting
  45. credit_card_setting
  46. credit_card_style_setting
  47. input_mask_setting
  48. maxlen_setting
  49. range_setting
  50. rules_setting

[/expand]

For your information, here is the order for the [expand title="Advanced Settings"]

  1. admin_label_setting
  2. size_setting
  3. default_value_setting
  4. default_value_textarea_setting
  5. error_message_setting
  6. credit_card_icon_style_setting
  7. captcha_language_setting
  8. css_class_setting
  9. add_icon_url_setting
  10. delete_icon_url_setting
  11. password_field_setting
  12. force_ssl_field_setting
  13. visibility_setting
  14. prepopulate_field_setting
  15. conditional_logic_field_setting
  16. conditional_logic_page_setting
  17. conditional_logic_nextbutton_setting

[/expand]

Add a ToolTip

Next is to add a tooltipGravity Forms Tooltip, so you will need to hook into gform_tooltips.
Gravity Forms ToolTip

ToolTips are fairly straight forward. Simply edit the tooltips. In to code below, I add a tooltip to my newly placed placement field and edit a tooltip of an existing placement field and tooltip.

[php]
//Filter to add a new tooltip
add_filter('gform_tooltips', 'wps_add_tos_tooltips');
function wps_add_tos_tooltips($tooltips){
$tooltips["form_field_tos"] = "<h6>Disable Submit Button</h6>Check the box if you would like to disable the submit button.";
$tooltips["form_field_default_value"] = "<h6>Default Value</h6>Enter the Terms of Service here.";
return $tooltips;
}
[/php]

Gravity Forms ToolTip

Now, here are all the [expand title="ToolTips"]

  • notification_send_to_email ToolTip -> Send To Email Address: Enter the email address you would like the administrator notification email sent to.
  • notification_autoformat ToolTip -> Disable Auto-Formatting: When enabled, auto-formatting will insert paragraph breaks automatically. Disable auto-formatting when using HTML to create email notification content.
  • notification_send_to_routing ToolTip -> Routing: Allows notification to be sent to different email addresses depending on values selected in the form.
  • notification_from_email ToolTip -> From Email Address: Enter the email address you would like the administrator notification email sent from, or select the email from available email form fields.
  • notification_from_name ToolTip -> From Name: Enter the name you would like the administrator notification email sent from, or select the name from available name fields.
  • notification_reply_to ToolTip -> Reply To: Enter the email address you would like to be used as the reply to address for the administrator notification email.
  • notification_bcc ToolTip -> Blind Carbon Copy Addresses: Enter a comma separated list of email addresses you would like to receive a BCC of the administrator notification email.
  • autoresponder_send_to_email ToolTip -> Blind Carbon Copy Addresses: Select the email form field that the user notification email should be sent to.
  • autoresponder_bcc ToolTip -> Blind Carbon Copy Addresses: Enter a comma separated list of email addresses you would like to receive a BCC of the user notification email.
  • autoresponder_from ToolTip -> From Email Address: Enter the email address you would like the user notification email sent from.
  • autoresponder_from_name ToolTip -> From Name: Enter the name you would like the user notification email sent from.
  • autoresponder_reply_to ToolTip -> Reply To Address: Enter the email address you would like to be used as the reply to address for the user notification email.
  • form_activity ToolTip -> Limit Form Activity: Limit the number of entries a form can generate and/or schedule a time period the form is active.
  • form_limit_entries ToolTip -> Limit Number of Entries: Enter a number in the input box below to limit the number of entries allowed for this form. The form will become inactive when that number is reached.
  • form_schedule_form ToolTip -> Schedule Form: Schedule a time period the form is active.
  • form_honeypot ToolTip -> Enable Anti-spam honeypot: Enables the honeypot spam protection technique, which is an alternative to the reCAPTCHA field.
  • form_animation ToolTip -> Enable Animation: Check this option to enable a sliding animation when displaying/hiding conditional logic fields.
  • form_tile ToolTip -> Form Title: Enter the title of your form.
  • form_description ToolTip -> Form Description: Enter a description for your form. This may be used for user instructions.
  • form_label_placement ToolTip -> Form Label Placement: Select the label placement. Labels can be top aligned above a field, left aligned to the left of a field, or right aligned to the left of a field.
  • form_description_placement ToolTip -> Description Placement: Select the description placement. Descriptions can be placed above the field inputs or below the field inputs.
  • form_button_text ToolTip -> Form Button Text: Enter the text you would like to appear on the form submit button.
  • form_button_image ToolTip -> Form Button Image: Enter the path to an image you would like to use as the form submit button.
  • form_css_class ToolTip -> Form CSS Class Name: Enter the CSS class name you would like to use in order to override the default styles for this form.
  • form_field_add_icon_url ToolTip -> Add Icon URL: Enter the URL of a custom image to replace the default 'add item' icon.
  • form_field_delete_icon_url ToolTip -> Delete Icon URL: Enter the URL of a custom image to replace the default 'delete item' icon.
  • form_confirmation_message ToolTip -> Confirmation Message Text: Enter the text you would like the user to see on the confirmation page of this form.
  • form_confirmation_autoformat ToolTip -> Disable Auto-Formatting: When enabled, auto-formatting will insert paragraph breaks automatically. Disable auto-formatting when using HTML to create the confirmation content.
  • form_redirect_to_webpage ToolTip -> Redirect Form to Page: Select the page you would like the user to be redirected to after they have submitted the form.
  • form_redirect_to_url ToolTip -> Redirect Form to URL: Enter the URL of the webpage you would like the user to be redirected to after they have submitted the form.
  • form_redirect_querystring ToolTip -> Pass Data Via Query String: To pass field data to the confirmation page, build a Query String using the 'Insert Merge Tag' drop down. ..more info on querystrings »
  • form_field_label ToolTip -> Field Label: Enter the label of the form field. This is the field title the user will see when filling out the form.
  • form_field_label_html ToolTip -> Field Label: Enter the label for this HTML block. It will help you identify your HTML blocks in the form editor, but it will not be displayed on the form.
  • form_field_disable_margins ToolTip -> Disable Default Margins: When enabled, margins are added to properly align the HTML content with other form fields.
  • form_field_recaptcha_theme ToolTip -> Recaptcha Theme: Select the visual theme for the reCAPTCHA field the available options to better match your site design.
  • form_field_captcha_type ToolTip -> CAPTCHA Type: Select the type of CAPTCHA you would like to use.
  • form_field_custom_field_name ToolTip -> Custom Field Name: Select the custom field name from available existing custom fields, or enter a new custom field name.
  • form_field_type ToolTip -> Field type: Select the type of field from the available form fields.
  • form_field_maxlength ToolTip -> Maximum Characters: Enter the maximum number of characters that this field is allowed to have.
  • form_field_maxrows ToolTip -> Maximum Rows: Enter the maximum number of rows that users are allowed to add.
  • form_field_date_input_type ToolTip -> Date Input Type: Select the type of inputs you would like to use for the date field. Date Picker will let users select a date from a calendar. Date Field will let users free type the date.
  • form_field_address_type ToolTip -> Address Type: Select the type of address you would like to use.
  • form_field_address_default_state_us ToolTip -> Default State: Select the state you would like to be selected by default when the form gets displayed.
  • form_field_address_default_state_canadian ToolTip -> Default Province: Select the province you would like to be selected by default when the form gets displayed.
  • form_field_address_default_country ToolTip -> Default Country: Select the country you would like to be selected by default when the form gets displayed.
  • form_field_address_hide_country ToolTip -> Hide Country: For addresses that only apply to one country, you can choose to not display the country drop down. Entries will still be recorded with the selected country.
  • form_field_address_hide_address2 ToolTip -> Hide Address Line 2: Check this box to prevent the extra address input (Address Line 2) from being displayed in the form.
  • form_field_address_hide_state_us ToolTip -> Hide State Field: Check this box to prevent the State field from being displayed in the form.
  • form_field_address_hide_state_canadian ToolTip -> Hide Province Field: Check this box to prevent Province field from being displayed in the form.
  • form_field_address_hide_state_international ToolTip -> Hide State/Province/Region: Check this box to prevent the State/Province/Region from being displayed in the form.
  • form_field_name_format ToolTip -> Field Name Format: Select the format you would like to use for the Name field. There are 3 options, Normal which includes First and Last Name, Extended which adds Prefix and Suffix, or Simple which is a single input field.
  • form_field_number_format ToolTip -> Number Format: Select the format of numbers that are allowed in this field. You have the option to use a comma or a dot as the decimal separator.
  • form_field_force_ssl ToolTip -> Force SSL: Check this box to prevent this field from being displayed in a non-secure page (i.e. not https://). It will redirect the page to the same URL, but starting with https:// instead. This option requires a properly configured SSL certificate.
  • form_field_card_style ToolTip -> Credit Card Icon Style: Select the style you would like to use for the credit card icons.
  • form_field_date_format Field Date Format: Select the format you would like to use for the date input. Available options are MM/DD/YYYY and DD/MM/YYYY.
  • form_field_time_format ToolTip -> Time Format: Select the format you would like to use for the time field. Available options are 12 hour (i.e. 8:30 pm) and 24 hour (i.e. 20:30).
  • form_field_fileupload_allowed_extensions ToolTip -> Allowed File Extensions: Enter that allowed file extensions for file uploads. This will limit what type of files a user may upload.
  • form_field_phone_format ToolTip -> Phone Number Format: Select the format you would like to use for the phone input. Available options are domestic US/CANADA style phone number and international long format phone number.
  • form_field_description ToolTip -> Field Description: Enter the description for the form field. This will be displayed to the user and provide some direction on how the field should be filled out or selected.
  • form_field_required ToolTip -> Required Field: Select this option to make the form field required. A required field will prevent the form from being submitted if it is not filled out or selected.
  • form_field_no_duplicate ToolTip -> No Duplicates: Select this option to limit user input to unique values only. This will require that a value entered in a field does not currently exist in the entry database for that field.
  • form_field_number_range ToolTip -> Number Range: Enter the minimum and maximum values for this form field. This will require that the value entered by the user must fall within this range.
  • form_field_admin_label ToolTip -> Admin Label: Enter the admin label of the form field. Entering a value in this field will override the Field Label when displayed in the Gravity Forms administration tool.
  • form_field_size ToolTip -> Field Size: Select a form field size from the available options. This will set the width of the field.
  • form_field_default_value ToolTip -> Default Value: If you would like to pre-populate the value of a field, enter it here.
  • form_field_validation_message ToolTip -> Validation Message: If you would like to override the default error validation for a field, enter it here. This message will be displayed if there is an error with this field when the user submits the form.
  • form_field_recaptcha_language ToolTip -> reCaptcha Language: Select the language you would like to use for the reCAPTCHA display from the available options.
  • form_field_css_class ToolTip -> CSS Class Name: Enter the CSS class name you would like to use in order to override the default styles for this field.
  • form_field_visibility ToolTip -> Visibility: Select the visibility for this field. Field visibility set to Everyone will be visible by the user submitting the form. Form field visibility set to Admin Only will only be visible within the Gravity Forms administration tool.Setting a field to Admin Only is useful for creating fields that can be used to set a status or priority level on submitted entries.
  • form_field_choices ToolTip -> Field Choices: Add Choices to this field. You can mark each choice as checked by default by using the radio/checkbox fields on the left.
  • form_field_choice_values ToolTip -> Enable Choice Values: Check this option to specify a value for each choice. Choice values are not displayed to the user viewing the form, but are accessible to administrators when viewing the entry.
  • form_field_conditional_logic ToolTip -> Conditional Logic: Create rules to dynamically display or hide this field based on values from another field
  • form_field_enable_enhanced_ui ToolTip -> Enable Enhanced UI: By selecting this option, the Chosen jQuery script will be applied to this field, enabling search capabilities to Drop Down fields and a more user-friendly interface for Multi Select fields.
  • form_field_other_choice ToolTip -> Other Choice: Check this option to add a text input as the final choice of your radio button field. This allows the user to specify a value that is not a predefined choice.
  • form_require_login ToolTip -> Require user to be logged in: Check this option to require a user to be logged in to view this form
  • form_require_login_message ToolTip -> Require Login Message: Enter a message to be displayed to users who are not logged in (shortcodes and HTML are supported gravityforms
  • form_page_conditional_logic ToolTip -> Page Conditional Logic: Create rules to dynamically display or hide this page based on values from another field
  • form_progress_indicator ToolTip -> Progress Indicator: Select which type of visual progress indicator you would like to display. Progress Bar, Steps or None
  • form_percentage_style ToolTip -> Progress Bar Style: Select which progress bar style you would like to use. Select custom to choose your own text and background color
  • form_page_names ToolTip -> Page Names: Name each of the pages on your form. Page names are displayed with the selected progress indicator
  • next_button_text ToolTip -> Next Button Text: Enter the text you would like to appear on the page next button
  • next_button_image ToolTip -> Next Button Image: Enter the path to an image you would like to use as the page next button
  • previous_button_text ToolTip -> Previous Button Text: Enter the text you would like to appear on the page previous button
  • previous_button_image ToolTip -> Previous Button Image: Enter the path to an image you would like to use as the page previous button
  • form_nextbutton_conditional_logic ToolTip -> Next Button Conditional Logic: Create rules to dynamically display or hide the page's Next Button based on values from another field
  • form_button_conditional_logic ToolTip -> Conditional Logic: Create rules to dynamically display or hide the submit button based on values from another field
  • form_field_post_category_selection ToolTip -> Post Category: Select which categories are displayed. You can choose to display all of them or select individual ones.
  • form_field_post_status ToolTip -> Post Status: Select the post status that will be used for the post that is created by the form entry.
  • form_field_post_author ToolTip -> Post Author: Select the author that will be used for the post that is created by the form entry.
  • form_field_post_format ToolTip -> Post Format: Select the post format that will be used for the post that is created by the form entry.
  • form_field_post_content_template_enable ToolTip -> Post Content Template: Check this option to format and insert merge tags into the Post Content.
  • form_field_post_title_template_enable ToolTip -> Post Title Template: Check this option to format and insert merge tags into the Post Title.
  • form_field_post_category ToolTip -> Post Category: Select the category that will be used for the post that is created by the form entry.
  • form_field_current_user_as_author ToolTip -> Use Current User as Author: Selecting this option will set the post author to the WordPress user that submitted the form.
  • form_field_image_meta ToolTip -> Image Meta: Select one or more image metadata field to be displayed along with the image upload field. They enable users to enter additional information about the uploaded image.
  • form_field_featured_image ToolTip -> Set as Featured Image: Check this option to set this image as the post's Featured Image.
  • form_field_prepopulate ToolTip -> Incoming Field Data: Check this option to enable data to be passed to the form and pre-populate this field dynamically. Data can be passed via Query Strings, Shortcode and/or Hooks
  • form_field_content ToolTip -> Content: Enter the content (Text or HTML) to be displayed on the form.
  • form_field_base_price ToolTip -> Base Price: Enter the base price for this product.
  • form_field_disable_quantity ToolTip -> Disable Quantity: Disables the quantity field. A quantity of 1 will be assumed or you can add a Quantity field to your form from the Pricing Fields.
  • form_field_product ToolTip -> Product Field: Select which Product this field is tied to.
  • form_field_mask ToolTip -> Input Mask: Input masks provide a visual guide allowing users to more easily enter data in a specific format such as dates and phone numbers.
  • form_standard_fields ToolTip -> Standard Fields: Standard Fields provide basic form functionality.
  • form_advanced_fields ToolTip -> Advanced Fields: Advanced Fields are for specific uses. They enable advanced formatting of regularly used fields such as Name, Email, Address, etc.
  • form_post_fields ToolTip -> Post Fields: Post Fields allow you to add fields to your form that create Post Drafts in WordPress from the submitted data.
  • form_pricing_fields ToolTip -> Pricing Fields: Pricing fields allow you to add fields to your form that calculate pricing for selling goods and services.
  • export_select_form ToolTip -> Export Selected Form: Select the form you would like to export entry data from. You may only export data from one form at a time.
  • export_select_forms ToolTip -> Export Selected Forms: Select the forms you would like to export.
  • export_select_fields ToolTip -> Export Selected Fields: Select the fields from the select form you would like to export data from.
  • export_date_range ToolTip -> Export Date Range: Select a date range. Setting a range will only export entries submitted during that date range. If no range is set, all entries will be exported.
  • settings_license_key ToolTip -> Settings License Key: Your Gravity Forms support license key is used to verify your support package, enable automatic updates and receive support.
  • settings_output_css ToolTip -> Output CSS: Select yes or no to enable or disable CSS output. Setting this to no will disable the standard Gravity Forms CSS from being included in your theme.
  • settings_html5 ToolTip -> Output HTML5: Select yes or no to enable or disable HTML5 output. Setting this to no will disable the standard Gravity Forms HTML5 form field output.
  • settings_recaptcha_public ToolTip -> reCaptcha Public Key: Enter your reCAPTCHA Public Key, if you do not have a key you can register for one at the provided link. reCAPTCHA is a free service.
  • settings_recaptcha_private ToolTip -> reCaptcha Private Key: Enter your reCAPTCHA Private Key, if you do not have a key you can register for one at the provided link. reCAPTCHA is a free service.
  • settings_currency ToolTip -> Currency: Please select the currency for your location. Currency is used for pricing fields and price calculations.
  • entries_conversion ToolTip -> Entries Conversion: Conversion is the percentage of form views that generated an entry. If a form was viewed twice, and one entry was generated, the conversion will be 50%.
  • widget_tabindex ToolTip -> Tab Index Start Value: If you have other forms on the page (i.e. Comments Form specify a higher tabindex start value so that your Gravity Form does not end up with the same tabindices as your other forms. To disable the tabindex, enter 0 (zero).
  • notification_override_email ToolTip -> Override Notifications: Enter a comma separated list of email addresses you would like to receive the selected notification emails.

[/expand]

Add my Custom External JS

Now my Advanced Custom Field would not be advanced or very custom if all I did was duplicate the Paragraph Text (textarea) field and add my custom placement field. Right now, the submit button does not disable for any reason.
Gravity Forms Submit Button

So, I need to make some further modifications to achieve my goal. This included my own custom external JS. So I needed to hook into gform_enqueue_scripts, which would allow me to properly enqueue scripts Gravity Forms would like.

[php]
// Add a script to the display of the particular form only if tos field is being used
add_action( 'gform_enqueue_scripts' , 'wps_gform_enqueue_scripts' , 10 , 2 );
function wps_gform_enqueue_scripts( $form, $ajax ) {
// cycle through fields to see if tos is being used
foreach ( $form['fields'] as $field ) {
if ( ( $field['type'] == 'tos' ) && ( isset( $field['field_tos'] ) ) ) {
$url = plugins_url( 'gform_tos.js' , __FILE__ );
wp_enqueue_script( "gform_tos_script", $url , array("jquery"), '1.0' ); // Note WPS_JS is a constant I've set for all my child theme's custom JS.
break;
}
}
}
[/php]

Here is my JS, which is really simple (if I can understand it).

[javascript]
jQuery(document).ready(function($) {
$(".gform_footer input[type='submit']").prop("disabled",true);

$(".gform_body textarea.gform_tos").scroll(function(){
if($(this).scrollTop()+$(this).height() >= $(this)[0].scrollHeight-10){
$(".gform_footer input[type='submit']").prop("disabled",false);
}
});

});
[/javascript]

Gravity Forms Submit Button Disabled

Add the Appropriate CSS Classes

Finally, in order to ease form display styling of the Terms of Service, I needed to make sure that I included a class. Now this could have been added with the gform_input_field hook, but I just wanted to display how it would work using this hook.

So I could hook into gform_field_css_class, which would allow me to add/change the CSS of the external fields. This hook is also great for all those designers who *cough*hate*cough* I mean love to style Gravity Forms CSS. Two little know documentation pages by Gravity Forms are its styling pages: CSS Ready Classes and CSS Targeting Samples. The interesting thing is that CSS Ready Classes gives an example of a Terms of Service, which requires a HTML box and a checkbox to state that you've read the TOS.

[php]
// Add a custom class to the field li
add_action("gform_field_css_class", "custom_class", 10, 3);
function custom_class($classes, $field, $form){

if( $field["type"] == "tos" ){
$classes .= " gform_tos";
}

return $classes;
}
[/php]

Here is a list of all the Gravity Forms [expand title="ready-to-use CSS classes."]

Halves

      : gf_left_half, gf_right_half

Thirds

      : gf_left_third, gf_middle_third, gf_right_third

Inline

      : gf_inline

List Classes

      : gf_list_2col, gf_list_3col, gf_list_4col, gf_list_5col, gf_list_inline

List Height Classes

      : gf_list_height_25, gf_list_height_50, gf_list_height_75, gf_list_height_100, gf_list_height_125, gf_list_height_150 (This applies a [X]px height value all multiple choice/checkbox items in that list. This can be useful to avoid "hanging floats" caused by list items of unequal height. This only applies to multiple choice/checkbox lists and work with any of the form label position settings.)

Other Classes

    : gf_scroll_text (hides the am/pm selector in the time field- this only hides the field on the form, not in the form entry tabl), gf_hide_charleft (hides the characters left counter beneath paragraph text fields when using the maximum characters option)

[/expand]

Note: the classes are added to the parent

  • element surrounding a field so you can define your own class name and add your own rules to your theme stylesheet based on that class name being added to the field.

Download the Code

[download id="18"]

Here is the full code:

[php]
<?php
/**
* Plugin Name: Gravity Forms Terms of Service Field
* Terms of Service Gravity Forms Custom Form Field
* Plugin URI: https://wpsmith.net/2011/plugins/how-to-create-a-custom-form-field-in-gravity-forms-with-a-terms-of-service-form-field-example/
* Donate link: https://wpsmith.net/donation
* Description: The first generation of this plugin will set a default image for post thumbnails for the Genesis framework.
* Version: 0.2 beta
* Author: Travis Smith
* Author URI: http://www.wpsmith.net/
* License: GPLv2
*
* Copyright 2012 Travis Smith (email : http://www.wpsmith.net/contact)
*
* This program is free software; you can redistribute it and/or modify
* it under the terms of the GNU General Public License, version 2, as
* published by the Free Software Foundation.
*
* This program is distributed in the hope that it will be useful,
* but WITHOUT ANY WARRANTY; without even the implied warranty of
* MERCHANTABILITY or FITNESS FOR A PARTICULAR PURPOSE. See the
* GNU General Public License for more details.
*
* You should have received a copy of the GNU General Public License
* along with this program; if not, write to the Free Software
*
* Foundation, Inc., 51 Franklin St, Fifth Floor, Boston, MA 02110-1301 USA
*
*/

// Add a custom field button to the advanced to the field editor
add_filter( 'gform_add_field_buttons', 'wps_add_tos_field' );
function wps_add_tos_field( $field_groups ) {
foreach( $field_groups as &$group ){
if( $group["name"] == "advanced_fields" ){ // to add to the Advanced Fields
//if( $group["name"] == "standard_fields" ){ // to add to the Standard Fields
//if( $group["name"] == "post_fields" ){ // to add to the Standard Fields
$group["fields"][] = array(
"class"=>"button",
"value" => __("Terms of Service", "gravityforms"),
"onclick" => "StartAddField('tos');"
);
break;
}
}
return $field_groups;
}

// Adds title to GF custom field
add_filter( 'gform_field_type_title' , 'wps_tos_title' );
function wps_tos_title( $type ) {
if ( $type == 'tos' )
return __( 'Terms of Service' , 'gravityforms' );
}

// Adds the input area to the external side
add_action( "gform_field_input" , "wps_tos_field_input", 10, 5 );
function wps_tos_field_input ( $input, $field, $value, $lead_id, $form_id ){

if ( $field["type"] == "tos" ) {
$max_chars = "";
if(!IS_ADMIN && !empty($field["maxLength"]) && is_numeric($field["maxLength"]))
$max_chars = self::get_counter_script($form_id, $field_id, $field["maxLength"]);

$input_name = $form_id .'_' . $field["id"];
$tabindex = GFCommon::get_tabindex();
$css = isset( $field['cssClass'] ) ? $field['cssClass'] : '';
return sprintf("<div class='ginput_container'><textarea readonly name='input_%s' id='%s' class='textarea gform_tos %s' $tabindex rows='10' cols='50'>%s</textarea></div>{$max_chars}", $field["id"], 'tos-'.$field['id'] , $field["type"] . ' ' . esc_attr($css) . ' ' . $field['size'] , esc_html($value));

}

return $input;
}

// Now we execute some javascript technicalitites for the field to load correctly
add_action( "gform_editor_js", "wps_gform_editor_js" );
function wps_gform_editor_js(){
?>

<script type='text/javascript'>

jQuery(document).ready(function($) {
//Add all textarea settings to the "TOS" field plus custom "tos_setting"
// fieldSettings["tos"] = fieldSettings["textarea"] + ", .tos_setting"; // this will show all fields that Paragraph Text field shows plus my custom setting

// from forms.js; can add custom "tos_setting" as well
fieldSettings["tos"] = ".label_setting, .description_setting, .admin_label_setting, .size_setting, .default_value_textarea_setting, .error_message_setting, .css_class_setting, .visibility_setting, .tos_setting"; //this will show all the fields of the Paragraph Text field minus a couple that I didn't want to appear.

//binding to the load field settings event to initialize the checkbox
$(document).bind("gform_load_field_settings", function(event, field, form){
jQuery("#field_tos").attr("checked", field["field_tos"] == true);
$("#field_tos_value").val(field["tos"]);
});
});

</script>
<?php
}

// Add a custom setting to the tos advanced field
add_action( "gform_field_advanced_settings" , "wps_tos_settings" , 10, 2 );
function wps_tos_settings( $position, $form_id ){

// Create settings on position 50 (right after Field Label)
if( $position == 50 ){
?>

<li class="tos_setting field_setting">

<input type="checkbox" id="field_tos" onclick="SetFieldProperty('field_tos', this.checked);" />
<label for="field_tos" class="inline">
<?php _e("Disable Submit Button", "gravityforms"); ?>
<?php gform_tooltip("form_field_tos"); ?>
</label>

</li>
<?php
}
}

//Filter to add a new tooltip
add_filter('gform_tooltips', 'wps_add_tos_tooltips');
function wps_add_tos_tooltips($tooltips){
$tooltips["form_field_tos"] = "<h6>Disable Submit Button</h6>Check the box if you would like to disable the submit button.";
$tooltips["form_field_default_value"] = "<h6>Default Value</h6>Enter the Terms of Service here.";
return $tooltips;
}

// Add a script to the display of the particular form only if tos field is being used
add_action( 'gform_enqueue_scripts' , 'wps_gform_enqueue_scripts' , 10 , 2 );
function wps_gform_enqueue_scripts( $form, $ajax ) {
// cycle through fields to see if tos is being used
foreach ( $form['fields'] as $field ) {
if ( ( $field['type'] == 'tos' ) && ( isset( $field['field_tos'] ) ) ) {
$url = plugins_url( 'gform_tos.js' , __FILE__ );
wp_enqueue_script( "gform_tos_script", $url , array("jquery"), '1.0' );
break;
}
}
}

// Add a custom class to the field li
add_action("gform_field_css_class", "custom_class", 10, 3);
function custom_class($classes, $field, $form){

if( $field["type"] == "tos" ){
$classes .= " gform_tos";
}

return $classes;
}
[/php]

Written by Travis Smith · Categorized: Plugins

Dec 12 2011

Filter Pages by Post Parent and Filter Pages/Posts by Pages/Posts Per on WordPress Edit Pages

Recently I migrated a site that had hundreds of pages, which made page management a potential nightmare. Seeing this potential, I developed a filter that would enable me to see various parts of the pages tree as well as allow me to set the number of pages I wanted to see.

To add a filter on the edit page, you must hook into 'restrict_manage_posts'. The function below will add 2 filters: pages_per filter and a post_parent page filter. The pages_per filter is something that can be used on all post types; however, the post_parent filter should only be used on pages (or other hierarchical post types--but for this tutorial, we will only do pages).

So here's what I did:
[php]
add_action ( 'restrict_manage_posts' , 'wps_restrict_manage_posts' );
function wps_restrict_manage_posts() {
global $typenow;

// only run this filter on page post type
if ( $typenow == 'page' ) {

// Parent Page Filter (HTML)
$args = array(
'child_of' => 0,
'show_option_none' => 'Show all pages',
'depth' => 2, //change this to whatever you want
'name' => 'wps_page_filter',
'selected' => $_GET['wps_page_filter'],
);
$dropdown = wp_dropdown_pages( $args );
}

// Per Page Filter (HTML)
global $wps_per_page;
$wps_per_page = isset( $_GET['wps_per_page'] ) ? (int) $_GET['wps_per_page'] : $wps_per_page;
?>
<select name="wps_per_page" style="width: 110px;">
<option <?php selected( $wps_per_page, 9999 ); ?> value="9999"><?php _e( 'Show all', FDA_DOMAIN ); ?></option>
<?php for( $i=10; $i<=100; $i+=10 ) : ?>
<option <?php selected( $wps_per_page, $i ); ?> value="<?php echo $i; ?>"><?php echo $i; ?> <?php _e( 'per page', FDA_DOMAIN ); ?></option>
<?php endfor; ?>
<?php if ( $wps_per_page != -1 && $wps_per_page != 9999 && ( $wps_per_page%10 != 0 || $wps_per_page > 100 ) ) : ?>
<option <?php selected( true ); ?> value="<?php echo (int) $wps_per_page; ?>"><?php echo (int) $wps_per_page; ?> <?php _e( 'per page', FDA_DOMAIN ); ?></option>
<?php endif; ?>
</select>
<?php
}
[/php]

Now, I wanted to add an option to show only top level pages only. This has to be done manually, darn WordPress for having no good filters in wp_dropdown_pages().
[php]
// Add an option to show top level pages only
add_filter ( 'wp_dropdown_pages' , 'wps_insert_option_in_dropdown' );
function wps_insert_option_in_dropdown ( $output ) {
$filter = $_GET['wps_page_filter'];
if ( $filter == 'parent' )
$selected = ' selected="selected"';
else
$selected = '';
$second_option = 'Show all pages</option><option value="parent"' . $selected . '>Parent Pages Only</option>';
return preg_replace( '#Show all pages</option>#' , $second_option , $output );
}
[/php]

Now, WordPress won't execute the filter for us, so we have to make sure this happens. This can be done in two separate functions; however, since it really doesn't matter pragmatically, we will keep with one function.
[php]
add_filter ( 'parse_query', 'wps_admin_posts_filter' );
function wps_admin_posts_filter( $query ) {
global $pagenow;

// Update pages_per (just because we are here, we do it in this function)
$wps_per_page = $_GET['wps_per_page'];
if ( isset( $wps_per_page ) && ( $wps_per_page == 9999 || ( $wps_per_page % 10 ) == 0 ) )
update_user_option( get_current_user_id(), 'edit_page_per_page', (int) $wps_per_page );

// Change query based on post_parent
$wps_page_filter = $_GET['wps_page_filter'];
if ( is_admin() && $pagenow == 'edit.php' && !empty( $wps_page_filter ) ) {
if ( $wps_page_filter == 'parent' )
$query->query_vars['post_parent'] = 0;
else
$query->query_vars['post_parent'] = $wps_page_filter;
}
}
[/php]

Written by Travis Smith · Categorized: Tutorials, WordPress

Dec 11 2011

How to Move a Group from DisplayBuddy Rotate Images to DisplayBuddy Slideshow

Here are a set of functions I recently wrote to move a group from DisplayBuddy Rotate Images to DisplayBuddy Slideshow. The user wanted to add some controls to the rotating images, which meant they needed to use Slideshow instead. So these functions make it extremely easy/fast for the user/developer.

[php]
/**
* Returns Slideshow defaults
*
* @return array defaults
*/
function get_slideshow_defaults() {
return array (
'title' => '',
'images' => array(),
'layout' => 'default' ,
'type' => 'slider' ,
'enable_css_files' => 'true' ,
'image_width' => 500 ,
'image_height' => 300 ,
'thumb_image_width' => 85 ,
'thumb_image_height' => 65 ,
'slider-align' => 'center' ,
'slider-effect' => 'random' ,
'slider-slices' => 15 ,
'slider-animSpeed' => 466 ,
'slider-pauseTime' => 233 ,
'slider-directionNav' => 'true' ,
'slider-directionNavHide' => 'true' ,
'slider-controlNav' => 'true' ,
'slider-controlNavThumbs' => 'false' ,
'slider-keyboardNav' => 'false' ,
'slider-pauseOnHover' => 'true' ,
'slider-captionOpacity' => 0.8 ,
'slider-shadows' => 'true' ,
'cycle-align' => 'center' ,
'cycle-fx' => 'fade' ,
'cycle-timeout' => 4000 ,
'cycle-continuous' => 0,
'cycle-speed' => 1000 ,
'cycle-speedIn' => 0 ,
'cycle-speedOut' => 0 ,
'cycle-sync' => 1 ,
'cycle-random' => 0 ,
'cycle-pause' => 1 ,
'cycle-autostop' => 0 ,
'cycle-autostopCount' => 3 ,
'cycle-delay' => 0,
'cycle-randomizeEffects' => 1,
'cycle-pb_pager' => 0,
);
}
/**
* Moves a group from Rotating Images to Slideshow
* and creates a backup of both for optional reset.
*
* @param string Group name
*/
function wps_move_rigroup_to_slideshow( $name ) {
$pluginbuddy_slideshow = get_option ( 'pluginbuddy_slideshow' );
$rotating_images = get_option ( 'ithemes-rotating-images' );
$count = 0;
$slideshow_defaults = get_slideshow_defaults();
foreach ( $rotating_images['groups'] as $group ) {
$count++;
if ( $group['name'] == $name ) {
$slideshow_defaults['title'] = $group['name'];
foreach ( $group['options']['image_ids'] as $image ) {
$slideshow_defaults['images'][] = $image['attachment_id'];
}
$pluginbuddy_slideshow['groups'][] = $slideshow_defaults;
unset($rotating_images['groups'][$count]);
break;
}
}

//Create backup for reset (future use)
update_option ( 'pluginbuddy_slideshow-backup' , $pluginbuddy_slideshow );
update_option ( 'ithemes-rotating-images-backup' , $rotating_images );

//Save
update_option ( 'pluginbuddy_slideshow' , $pluginbuddy_slideshow );
update_option ( 'ithemes-rotating-images' , $rotating_images );
}

/**
* Moves all groups from Rotating Images to Slideshow
* with an option to exclude some groups
* and creates a backup of both for optional reset.
*
* @param array Group names (string)
*/
function wps_move_rigroups_to_slideshow( $excludes ) {
$rotating_images = get_option ( 'ithemes-rotating-images' );
$count = 0;
$slideshow_defaults = get_slideshow_defaults();
foreach ( $rotating_images['groups'] as $group ) {
$count++;
foreach ( $excludes as $exclude ) {
if ( $group['name'] == $exclude )
continue 2;
}
$slideshow_defaults['title'] = $group['name'];
foreach ( $group['options']['image_ids'] as $image ) {
$slideshow_defaults['images'][] = $image['attachment_id'];
}
$pluginbuddy_slideshow['groups'][] = $slideshow_defaults;
unset($rotating_images['groups'][$count]);
}

//Create backup for reset (future use)
update_option ( 'pluginbuddy_slideshow-backup' , $pluginbuddy_slideshow );
update_option ( 'ithemes-rotating-images-backup' , $rotating_images );

//Save
update_option ( 'pluginbuddy_slideshow' , $pluginbuddy_slideshow );
update_option ( 'ithemes-rotating-images' , $rotating_images );
}
[/php]

Written by Travis Smith · Categorized: Plugins

Dec 08 2011

How to Add Genesis Custom Content Columns to the Editor (to Appear in Visual Mode)

Recently, I had a need to have the custom columns of WordPress on the backend to be used in the Visual Editor. So thanks to a few tutorials out there regarding this, especially Alison's Mastering the TinyMCE Styles Dropdown in the WordPress Visual Editor, who has a great plugin, Custom Styles Dropdown, and WPEngineer's, Customize WordPress WYSIWYG Editor (more for a better understanding). Another option is the Advanced TinyMCE WordPress Plugin. I plan to develop this into a plugin, coming soon...

However, this tutorial will focus solely on the Custom Content Columns for Genesis users. If you need an explanation, please see Alison's Mastering the TinyMCE Styles Dropdown in the WordPress Visual Editor post.

Add this to your functions.php file.
[php]
add_filter( 'mce_buttons_2', 'wps_mce_buttons_2' );
/**
* Show the style dropdown on the second row of the editor toolbar.
*
* @param array $buttons Exising buttons
* @return array Amended buttons
*/
function wps_mce_buttons_2( $buttons ) {

// Check if style select has not already been added
if ( isset( $buttons['styleselect'] ) )
return;

// Appears not, so add it ourselves.
array_unshift( $buttons, 'styleselect' );
return $buttons;

}

add_filter( 'tiny_mce_before_init', 'wps_mce_before_init' );
/**
* Add column entries to the style dropdown.
*
* 'text-domain' should be replaced with your theme or plugin text domain for
* translations.
*
* @param array $settings Existing settings for all toolbar items
* @return array Amended settings
*/
function wps_mce_before_init( $settings ) {

$style_formats = array(

array(
'title' => __( 'First Half', 'text-domain' ),
'block' => 'div',
'classes' => 'one-half first',
),
array(
'title' => __( 'Half', 'text-domain' ),
'block' => 'div',
'classes' => 'one-half',
),
array(
'title' => __( 'First Third', 'text-domain' ),
'block' => 'div',
'classes' => 'one-third first',
),
array(
'title' => __( 'Third', 'text-domain' ),
'block' => 'div',
'classes' => 'one-third',
),
array(
'title' => __( 'First Quarter', 'text-domain' ),
'block' => 'div',
'classes' => 'one-fourth first',
),
array(
'title' => _( 'Quarter', 'text-domain' ),
'block' => 'div',
'classes' => 'one-fourth',
),
array(
'title' => __( 'First Fifth', 'text-domain' ),
'block' => 'div',
'classes' => 'one-fifth first',
),
array(
'title' => __( 'Fifth', 'text-domain' ),
'block' => 'div',
'classes' => 'one-fifth',
),
array(
'title' => __( 'First Sixth', 'text-domain' ),
'block' => 'div',
'classes' => 'one-sixth first',
),
array(
'title' => __( 'Sixth', 'text-domain' ),
'block' => 'div',
'classes' => 'one-sixth',
),
);

// Check if there are some styles already
if ( $settings['style_formats'] )
$settings['style_formats'] = array_merge( $settings['style_formats'], json_encode( $style_formats ) );
else
$settings['style_formats'] = json_encode( $style_formats );

return $settings;

}
[/php]

This will result in this:
Custom Columns in the Editor

However, the HTML will contain the necessary classes and styles and will be:
[html]
<div class="one-half first">Lorem ipsum dolor sit amet, consectetur adipiscing elit. Aenean quam massa, iaculis vel vehicula aliquam, iaculis ut risus. Mauris luctus, justo quis blandit vestibulum, dui lorem rhoncus massa, non aliquam ante erat at dolor. In facilisis libero in libero pharetra eu pellentesque mauris convallis. In vitae tortor lorem. Nullam aliquet ligula vel lectus pretium eget elementum massa laoreet. In hac habitasse platea dictumst. Quisque lacinia odio vitae nisl dictum euismod. Suspendisse eget nisl quis leo pulvinar cursus. Aliquam vel elit vehicula neque consectetur blandit eu eget nisi. Maecenas vitae risus quis lacus feugiat dictum sed eget arcu. Class aptent taciti sociosqu ad litora torquent per conubia nostra, per inceptos himenaeos. Nulla feugiat massa ut mauris viverra porta.</div>
<div class="one-half">Fusce porttitor libero ut libero aliquam vitae faucibus lorem tincidunt. Phasellus pharetra libero et eros pellentesque eget feugiat eros adipiscing. Pellentesque massa augue, interdum ut facilisis et, pellentesque et justo. Proin consectetur venenatis vehicula. Aliquam interdum ullamcorper urna, quis volutpat massa dictum non. Integer placerat nunc porttitor lacus volutpat ultricies. Integer ornare ultrices nibh sed hendrerit. Class aptent taciti sociosqu ad litora torquent per conubia nostra, per inceptos himenaeos.</div>
[/html]

Now you can also add the following to incorporate your CSS into the Visual Editor to achieve a closer representation on the backend (that will eventually appear on the front end):
[php]
add_editor_style();
[/php]
Now, the add_editor_style(); is a really cool feature. Now you can add a stylesheet to your child theme's folder called editor-style.css, and any style that you want to appear in the editor will now appear in the visual editor as it would on the external pages. So to get the custom column classes, you will need to create the editor-style.css.

Here is what your visual editor will look like with the use of add_editor_style();
Custom Columns with add_editor_style()

However, you do not need to add the add_editor_style(); for this to work. Adding the add_editor_style(); only allows the style to be applied inside the Visual editor.

[css]
/* Column Classes
------------------------------------------------------------ */

.five-sixths,
.four-fifths,
.four-sixths,
.one-fifth,
.one-fourth,
.one-half,
.one-sixth,
.one-third,
.three-fifths,
.three-fourths,
.three-sixths,
.two-fifths,
.two-fourths,
.two-sixths,
.two-thirds {
float: left;
margin: 0 0 20px;
padding-left: 3%;
}

.one-half,
.three-sixths,
.two-fourths {
width: 48%;
}

.one-third,
.two-sixths {
width: 31%;
}

.four-sixths,
.two-thirds {
width: 65%;
}

.one-fourth {
width: 22.5%;
}

.three-fourths {
width: 73.5%;
}

.one-fifth {
width: 17.4%;
}

.two-fifths {
width: 37.8%;
}

.three-fifths {
width: 58.2%;
}

.four-fifths {
width: 78.6%;
}

.one-sixth {
width: 14%;
}

.five-sixths {
width: 82%;
}

.first {
clear: both;
padding-left: 0;
}
[/css]

Or simply download the file below and place inside your child theme folder.
Download: [download id="17"]

Written by Travis Smith · Categorized: Genesis, Tutorials

  • « Previous Page
  • 1
  • …
  • 28
  • 29
  • 30
  • 31
  • 32
  • …
  • 60
  • Next Page »

Need Help?

Please let us know how we can help you!

Get Help

Recommendations

Genesis WordPress Framework
Sucuri Security
Gravity Forms
GetSoliloquy
Get Envira
Scribe SEO
BackupBuddy
WordPress Video User Manuals

Recent Posts

  • Solving WordPress 5XX Server Errors on SiteGround
  • Hiding an User in the WordPress Admin
  • Custom Rewrite Rules for Custom Post Types and Taxonomies
  • WordPress JavaScript Manager Native Functions
  • Causes of WordPress Site Performance Slowdown

About Travis

As a WordPress enthusiast, developer, and speaker, Travis writes about what he learns in WordPress trying to help other WordPress travelers, beginners and enthusiasts with tutorials, explanations, & demonstrations.

  • Twitter
  • Facebook
  • LinkedIn
  • Google+
  • RSS

Copyright © 2025 � WP Smith on Genesis on Genesis Framework � WordPress � Log in