For one of my projects, I was asked to make the entire WordPress Blog login protected whereby people had to request via a form on the site for access. In doing this everyone was redirected to the login form without a registration link (because they did not want to use the traditional WordPress registration and preferred a manual registration). Anyways, I had to add a message on the login screen to point people to a contact form. Since WordPress 2.8, you can add a custom_login_message. There are a ton of plugins that will help you customize the look of the login screen; however, none that I could find helped you add any text or links to the login screen without simply highjacking the core code or replacing all of the wp-login.php file with a custom one. So here is what you can do:
[php]function custom_login_message() {
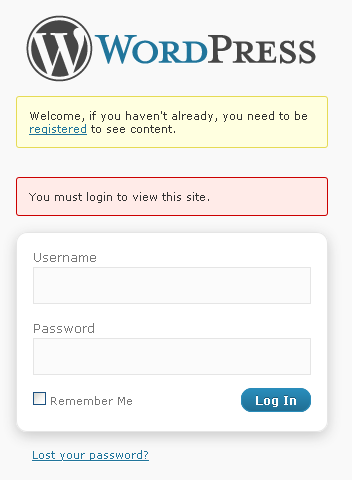
$message = "<p class='message'>Welcome, if you haven't already, you need to be <a href='http://photoblog.smithsaga.com/registration/'>registered</a> to see content.</p><br />";
return $message;
}
add_filter('login_message', 'custom_login_message');
?>[/php]
The p class='message' puts the message in a yellow box. If you prefer red, simply change message to login_error.
And if you want a custom message on the registration screen:
[php]function custom_register_message() {
$message = "<p class='message'>Welcome, if you haven't already, you need to be <a href='http://photoblog.smithsaga.com/registration/'>registered</a> to see content.</p><br />";
return $message;
}
add_filter('register_message', 'custom_register_message');
[/php]