WP Smith

Creating WordPress & Genesis Websites Since 2010

  • Home
  • About
  • Services
  • Blog
  • Contact

Jul 02 2010

Editing Network Options

When you are editing the Network Options, the options are fairly explainable. However, I wanted to add a couple things to some of the items. First you deal with Operational Settings, which include Network Name and Network Admin Email. Both are self-explainatory; however, the Network Name is what appears when a new blog is started on the domain. For example, if I were to start myblog on mydomain.com, just as WordPress has "Another WordPress blog" (or whatever), your multi-site will say "Just another My Network Name Site" for mysite.mydomain.com.

Under Dashboard Settings, the Dashboard Site, which was somewhat confusing for me at first, will create a sub-site if you wish to use a separate site to administer your users. If left blank (which it will default to if you enter anything with a space), it will add all new users to mydomain.com. Personally, I would also change the admin notice feed to something else other than the main site feed, as it recommends. I would also create a Feedburner feed so if I ever decide to change or manipulate it, I am dealing with Feedburner, which has a lot more flexibility unless you want to create your own RSS feed.

Under Registration Settings, if you have Registration disabled for whatever reason, you'll notice that Multi-Site recommends "please set NOBLOGREDIRECT in wp-config.php to a URL you will redirect visitors to if they visit a non-existent site." What is this? How do I do this?

First the define NOBLOGREDIRECT redirects a person to your chosen URL if/when someone enters a subdomain/subdirectory that does not exist on your site. You could use this to go to a SEARCH page, a FAQ page, or some other custom page. If you do not use this, then when someone enters http://badsubdomain.mydomain.com (a site that does not exist), it would direct them to the SIGNUP page asking whether or not the visitor can create the bad subdomain in question. Here is a good explanation on the NOBLOGREDIRECT and 404s.

Second, open wp-config.php and add among the define additions the following:

[php]<strong>define('NOBLOGREDIRECT', '%siteurl%');</strong>[/php]

The rest is fairly self-explanatory. Enjoy!

Written by Travis Smith · Categorized: Tutorials

Jul 01 2010

How to Enable WordPress 3.0 Multi-Site

Click for Larger image

To enable Multi-Site you must have access to the core WordPress files. You must have access to your .htaccess file as well.

Next you want to open wp-config.php in your favorite text editor and find the line (probably around line 70 if you are using a text editor with line numbers) that says /* That's all, stop editing! Happy blogging. */. Above this line (so line 68-69), add define('WP_ALLOW_MULTISITE', true);.

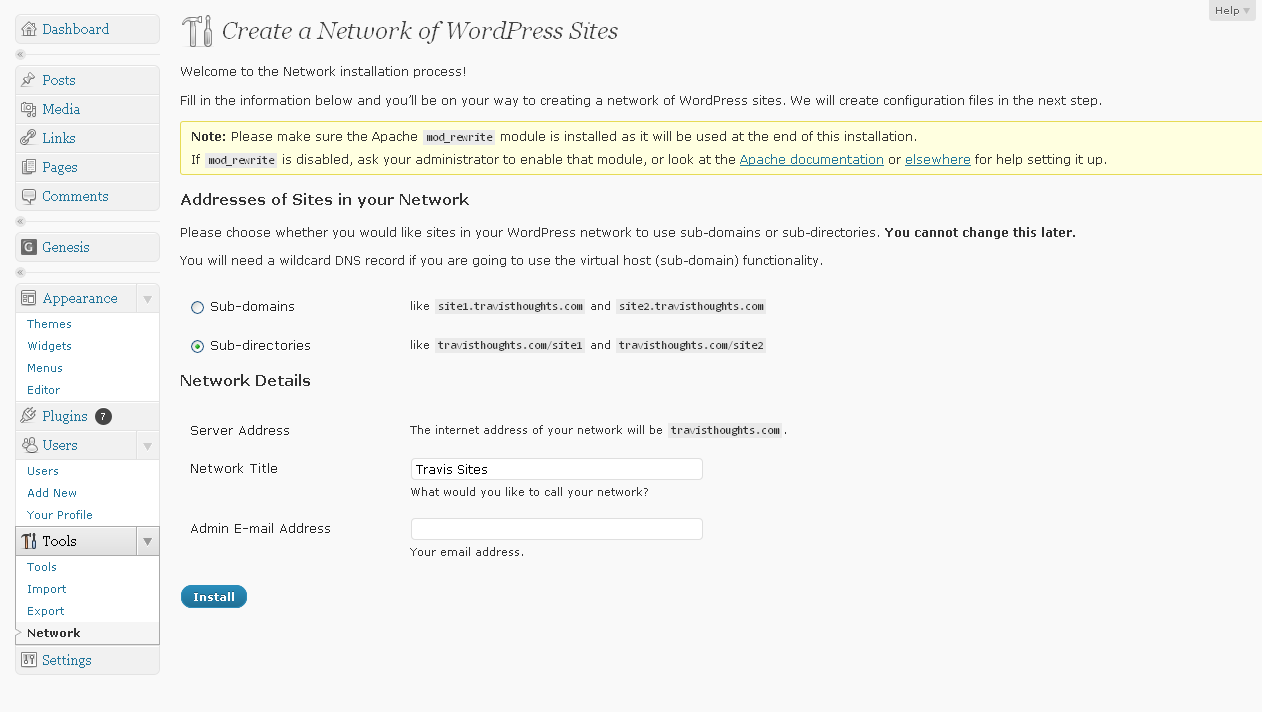
Then Network will appear under Tools.  Once it appears, click on Network. This will bring up a list of instructions, including deactivating all plugins. Decide whether you want to use Sub-domains (http://subdomain.mydomain.com) or sub-directories (http://mydomain.com/subdirectory). If you wish to use sub-domains, the first thing you want to do is add a subdomain of *. So log into cpanel (or whatever you are using), click on Add Subdomains. In subdomain, enter just an * (asterisk). Be sure to set your document root correctly if you have shared hosting. Then click CREATE. Once this is complete, then click INSTALL.

Click for Larger image

Otherwise you will get this error:

Click for Larger image

Then you want to open your text editor again with a new blank document, and select SAVE AS and name it "blog.dir" (without the "" marks). Then FTP this file to your mydomain.com/wp-content directory.

Follow steps 2-3 as they are on the screen editing the wp-config.php file again. So on line 68-69 before /* That’s all, stop editing! Happy blogging. */ add the following:

[php]define( 'MULTISITE', true );
define( 'SUBDOMAIN_INSTALL', true );
$base = '/';
define( 'DOMAIN_CURRENT_SITE', 'mydomain.com' );
define( 'PATH_CURRENT_SITE', '/' );
define( 'SITE_ID_CURRENT_SITE', 1 );
define( 'BLOG_ID_CURRENT_SITE', 1 );[/php]

You will also be given unique authentication keys that you will need to add. For example:

[php]define( 'AUTH_SALT', 'I)(-Zo_@`zf4S,{,)(li~,yd$95TyX X+N#~ehC-Y;5M~:Aj||D0dYij~Xg+Q3|V' );
define( 'SECURE_AUTH_SALT', '2k_cJ?_-#q$CAXQV#rj{AT %mb}iyN#?qit,0zujTTyzx(/%kg7XS86hf26iQ0:G' );
define( 'LOGGED_IN_SALT', ';u,XF m9(_!+(##Ql@Cy}jBKdb6~3h0]5XZtcR.V[[email protected]:0+4@v-ZF] q' );
define( 'NONCE_SALT', '4x3!hW|;l[*1m)KP.1L&1LfRU@7yX&l62j:h&4P_PCZ4Jkh}xaqSLWhi Q1v@C9Z' );[/php]

To create your .htaccess, open a blank file in your text editor, and copy this code:

[php]RewriteEngine On
RewriteBase /
RewriteRule ^index.php$ - [L]

# uploaded files
RewriteRule ^files/(.+) wp-includes/ms-files.php?file=$1 [L]

RewriteCond %{REQUEST_FILENAME} -f [OR]
RewriteCond %{REQUEST_FILENAME} -d
RewriteRule ^ - [L]
RewriteRule . index.php [L][/php]

Then click SAVE AS and name it .htaccess (with the period in the front). Then FTP this over to your root directory where your wp-config.php file sits. Once the new wp-config.php and the .htaccess files are setup and FTPed to the site. Click Log in.

Once you log back in, you will need to set the Options page, which is another post!

Click for Larger image

Written by Travis Smith · Categorized: Tutorials

Jun 20 2010

How to Display Only Twitter Messages with a Certain Hashtag

I see in a lot of places blogs about the ability to display their last tweet or tweets. However, I wanted to be able to display tweets that come from a specific user using a specific hashtag. So let's say anytime @bob wanted to tweet something with #somehash, the following PHP code will allow you to display just those tweets in WordPress. So you first need to decide (1) how many of the last tweets that you want to display ($count), (2) whether to hide replies, and (3) then what hashtag you would like to display (with or without the #).

I am working this into a twitter widget plugin.

[php]
$twitter_count= 5; //Set this to the number of tweets you want to display
$yourhashtag = 'myhashtag'; //Set this to a chose hashtag with or without #
$yourtwitter_username='username'; //Set this to your username with or without @
$twitter_hidereplies=False; //If you want to hide them, change to: $twitter_hidereplies=True;

//do not change anything below this line
$twitter_usernameA= '@'.str_replace("@","",$yourtwitter_username);
$twitter_username= str_replace("@","",$yourtwitter_username);

$twitter = wp_remote_retrieve_body( wp_remote_request( 'http://twitter.com/statuses/user_timeline/'. $twitter_username.'.json?count=1' ) );
$json = json_decode($twitter);
$count=$json[0]->user->statuses_count;

$twitter = wp_remote_retrieve_body( wp_remote_request( 'http://twitter.com/statuses/user_timeline/'. $twitter_username .'.json?count='.$count ) );
$json = json_decode($twitter);
if( is_wp_error($twitter) ) {
$tweets[] = '<li>There was an error while attempting to contact the Twitter API. Please try again.</li>' . "n";
}
elseif( $json->error ) {
$tweets[] = '<li>The Twitter API returned an error while processing your request. Please try again</li>' . "n";
}
else
{
$hashtag = '#'.str_replace("#","",$yourhashtag);
// Build the tweets array
foreach( (array)$json as $tweet )
{
// don't include @ replies (if applicable)
if( $twitter_hidereplies && $tweet->in_reply_to_user_id )
continue;

// stop the loop if we've got enough tweets
if( $tweets[$twitter_count - 1] )
break;

//adds tweets if hashtag_only was selected
$pos = strpos($tweet->text,$hashtag);
if ($pos === false)
continue;
$timeago = sprintf('about %s ago', human_time_diff(strtotime($tweet->created_at)));
$timeago_link = '<a href="http://twitter.com/'.$twitter_username.'/status/'.$tweet->id.'" rel="nofollow">'.$timeago.'</a>';
$tweets[] = '<li>'. $tweet->text . ' <span style="font-size: 85%;">' . $timeago_link . '</span></li>' . "n";
}
foreach( (array)$tweets as $tweet ) {
echo $tweet;}
}

[/php]

Written by Travis Smith · Categorized: Tutorials

May 21 2010

How to Move Your Podcast and Blog from LibSyn.com (3.0) to WordPress with PodPress

I truly believe that WordPress is fully capable of running some high quality websites with a wide variety of features and functionality. And one of the great qualities of WordPress is its ability to have a variety of feeds and even podcast from WordPress instead of having to use a library. One of the best hosting companies to use if you are using WordPress and want to host your own podcast via podPress or even PowerPress or even Feedburner is Hostgator.

In this post, I am going to assume that you already have a WordPress blog and that you have already installed PodPress (but if you haven't simply go to Plugins > Add New, search for "Podpress" and select Install by PodPress and then Install Now, then Activate it). So how do you move your podcast and blog from LibSyn 3 to WordPress with podPress. This process requires proper setup of Podpress, the setup of Feedburner, and the adjustments in LibSyn.

1. Get your iTunes Feed ID & insert it into PodPress
Once the plugin has been activated, go to the PodPress > Feed/iTunes Settings, insert your iTunes Feed ID (http://phobos.apple.com/WebObjects/MZStore.woa/wa/viewPodcast?id=FEEDID). Then after you fill in everything else, click Update Options at the bottom.

You can ping your iTunes Feed ID here to see what the current feed is by filling out the form below (opens in a new tab). Upon submission it will tell you where iTunes is currently drawing your feed.

2. SetupFeedburner RSS PodcastingFeedburner
The reason that we need a Feedburner account, it makes transitions moving back and forth from different platforms while maintaining a good solid RSS. So while I am tinkering with my WordPress feed and setting up my podPress feed, the feed for my podcast is secure. Then when I am ready, I can adjust my feed in feedburner without having to hit iTunes with their XML new-feed tag. So you'll want to setup a Feedburner feed for your podcasts. To do this, go to Feedburner and create a podcast feed. If you have a Gmail or a Google account, log in using that. If you don't, create one because you will definitely need it. Then under "Burn a feed right this instant. Type your blog or feed address here:" enter you LibSyn.com RSS feed, which will be something like: http://yourusername.libsyn.com/rss. Then click on "I'm a podcaster" which will bring up Smartcast for you, which will have all the elements needed for iTunes. Then click NEXT. Fill in the Title and Feed Address. Then click NEXT twice. Under Smartcast, fill in the information just like you have in PodPress, and click NEXT. Then select whether you want the additional statistics and click NEXT, and you're done!

3. Export Your LibSyn Blog
Then go to your LibSyn RSS feed. You can go to libsyn.com and log into your account. Then at the bottom click on the RSS link under RSS Syndication of your podcast. When that appears, right click and View Source or "View Page Source" in Firefox. Then save the document to your desktop as whatever.xml. Then go back to your WordPress.org blog and go to Tools > Import (wp-admin/import.php). Select RSS, and then import that newly saved XML file. This will import all your recent blogs from LibSyn.

4. Setup/Adjust LibSyn
Now you want to go back into the back end of your LibSyn account. You can do this by either hitting the back button from yourlibsynusername.libsyn.com/rss or simply logging back into your account. Navigate to Settings and then click on Advanced. Under "opt in" slightly above the RSS feed, enter your feedburner feed (http://feeds.feedburner.com/yourfeedburnerfeed) and select "Redirect yourlibsynusername.libsyn.com/rss to this URL." This will make the transition easier whenever you are ready. Then click SAVE CHANGES at the bottom.

5. Finally Make the Switch
To make the transition happen there is something you have to do within LibSyn. When you are ready to move your feed completely, go back to your LibSyn account, login, go to Settings > Advanced. At the bottom, you want to add the following code in the bottom box labeled "Additional Tags."

[code]<itunes:new-feed-url>http://feeds.feedburner.com/yourfeedburnerfeed</itunes:new-feed-url>[/code]

If you do not wish to use Feedburner, your code will be something like this:

[code]<itunes:new-feed-url>http://newlocation.com/example.rss</itunes:new-feed-url>[/code]

If you use a manual feed and do not want to use Feedburner, WordPress or whatever, you can simply add this code to your old feed anywhere after the 'channel' tag and before the first 'item' tag (obviously not within any other tag). This will replace the URL in iTunes. (See Apple's Docs, Change Podcast Feed Forum, Podcast Forum)

Then click SAVE CHANGES. While I am not sure how long it takes for LibSyn, podPress and iTunes to sync and update, it did it for me in less than an hour with this method; however, Apple and iTunes suggests that you allow 24-48 hours.

Now, if for some reason that your RSS feed does not change, there are some other options and things that you can do. First, you can try the forums above. Second, and I suggest as a last resort, you can contact Apple. If you want to contact Apple, do not make them have to do any work or contact you for any further details. So be as specific and detailed as possible. Always include your Feed ID and URLs involved for their information, even if the problem doesn't relate to a specific feed URL. If the problem is with a podcast that is already in the iTunes Store, include the link to the podcast in the Store (if you don't have it, right-click on the podcast's cover art and choose "Copy iTunes Store URL"). Now you are ready to contact Apple about your podcasts here.

Written by Travis Smith · Categorized: Tutorials

May 06 2010

Remove “Powered by podPress” in the Footer

If you want to remove the podPress footer from your theme, you have a couple options. First, the simplest is to check under Podpress > General Settings, and the last checkbox has to do with Credit. Simply uncheck it to remove it from your footer (unless you want everyone to know who/what made everything so bad [as they say in their admin section]).

If you have Thesis, you can add this to your custom functions.php file:

[php]function remove_podpress_footer () {
remove_action('wp_footer','podPress_wp_footer');
}
add_action('wp_footer','remove_podpress_footer', 9);[/php]

Placing the 9 (or even an 8) ensures that this code runs before that of Podpress’s code since the default is 10 (thanks to Henrik Melin and his post).

However, if you are not using Thesis/Genesis, must do this inside the plugin, besides buying one of these frameworks, you want to open the plugins editor to edit podpress/podpress.php and find the code that looks like this:

[php]    function podPress_wp_footer() {
GLOBAL $podPress, $podPress_inAdmin;
if(!$podPress_inAdmin) {
if(!$podPress->settings['compatibilityChecks']['themeTested']) {
$podPress->settings['compatibilityChecks']['themeTested'] = true;
podPress_update_option('podPress_config', $podPress->settings);
}
}
if(!$podPress_inAdmin) {
if(!$podPress->settings['compatibilityChecks']['wp_footer']) {
$podPress->settings['compatibilityChecks']['wp_footer'] = true;
podPress_update_option('podPress_config', $podPress->settings);
} else {
$podPress->settings['compatibilityChecks']['wp_footer'] = true;
}
}

if($podPress->settings['enableFooter']) {
$diplay = 'block';
} else {
$diplay = 'none';
}
echo '<div id="podPress_footer" style="display: '.$diplay.'; text-align: center;"><cite>'.__('Podcast Powered by ', 'podpress').'<a href="http://www.mightyseek.com/podpress/" title="podPress, '.__('the dream plugin for podcasting with WordPress', 'podpress').'"><strong>podPress (v'.PODPRESS_VERSION.')</strong></a></cite></div>';
}[/php]

And you want to comment out this section by adding /* at the beginning and */ at the end, so that:

[php]/* function podPress_wp_footer() {
GLOBAL $podPress, $podPress_inAdmin;
if(!$podPress_inAdmin) {
if(!$podPress->settings['compatibilityChecks']['themeTested']) {
$podPress->settings['compatibilityChecks']['themeTested'] = true;
podPress_update_option('podPress_config', $podPress->settings);
}
}
if(!$podPress_inAdmin) {
if(!$podPress->settings['compatibilityChecks']['wp_footer']) {
$podPress->settings['compatibilityChecks']['wp_footer'] = true;
podPress_update_option('podPress_config', $podPress->settings);
} else {
$podPress->settings['compatibilityChecks']['wp_footer'] = true;
}
}

if($podPress->settings['enableFooter']) {
$diplay = 'block';
} else {
$diplay = 'none';
}
echo '<div id="podPress_footer" style="display: '.$diplay.'; text-align: center;"><cite>'.__('Podcast Powered by ', 'podpress').'<a href="http://www.mightyseek.com/podpress/" title="podPress, '.__('the dream plugin for podcasting with WordPress', 'podpress').'"><strong>podPress (v'.PODPRESS_VERSION.')</strong></a></cite></div>';
}*/[/php]

Then you want to find the following code

[php]add_action('wp_footer', 'podPress_wp_footer');[/php]

and comment it out so that:

[php]/*add_action('wp_footer', 'podPress_wp_footer');*/[/php]

Written by Travis Smith · Categorized: Tutorials

  • « Previous Page
  • 1
  • …
  • 15
  • 16
  • 17
  • 18
  • Next Page »
  • Twitter
  • Facebook
  • LinkedIn
  • Google+
  • RSS

Copyright © 2025 � WP Smith on Genesis on Genesis Framework � WordPress � Log in