WP Smith

Creating WordPress & Genesis Websites Since 2010

  • Home
  • About
  • Services
  • Blog
  • Contact

Apr 16 2010

Remove or Replace “Blog Comments Powered by DISQUS”

This line of code that you are wanting to hide is:
[html]<a href="http://disqus.com" class="dsq-brlink">blog comments powered by <span class="logo-disqus">Disqus</span></a>[/html]

There are two ways to hide this: CSS & php. In CSS, just go to your DISQUS CSS file located in COMMENTS > DISQUS > SETTINGS > APPEARANCE and add
[html].dsq-brlink {display:none;}
.logo-disqus {display:none;}[/html]

Or, if you wish to edit the file in WordPress, which is typically not advisable, especially if you do not have access via FTP to your files as a change may render your site inoperable. So with that caution,  go under Plugins and select Editor. Where it says, "Select what plugin to edit," you want to select Disqus Comment System. Then click Select. Then you want to select the disqus-comment-system/comments.php file on the right side, which should be located at the bottom. If you do this through a FTP and you are using a folder system (where each plugin is located in its own folder), simply navigate to your plugins directory, typically /yourdomainrootfolder/wp-content/plugins/disqus-comment-system/comments.php is the file that you want to get.

At line 30 you will find:

[html] <a href="http://disqus.com">blog comments powered by <span>Disqus</span></a> [/html]

Simply delete the entire line, or write whatever you'd like to write there.
Written by Travis Smith · Categorized: Tutorials

Apr 08 2010

How to Remove the Borders in Thesis 1.7

thesis borders
Click for Larger Image

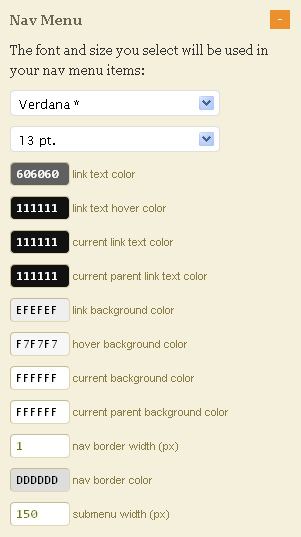
If you do not wish to have any borders in your Thesis layout, one method would be to edit the custom.css file to make this happen. However, Thesis does have the user-friendly ability to remove these things as well. There are two things that you must do.

  1. Remove the Navigation Menu border.
  2. Remove the Interior borders.

To remove the navigation menu border, under Thesis Design Options, which is located under Thesis > Design Options, expand the Nav Menu section at the top left. Scroll until you can see "nav border width (px)." Change the default 1 to 0 (zero).

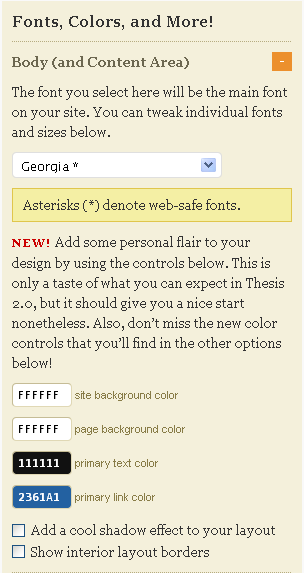
To remove the interior borders, under Thesis Design

thesis borders
Click for Larger Image
Options, which is located under Thesis > Design Options, expand the Body (and Content Area) section at the top left. Scroll until you can see "Show interior layout borders," which is the last option in the section. Uncheck that option.

Written by Travis Smith · Categorized: Tutorials

Apr 07 2010

Flash Video Hiding My CSS Navigation Menu

In one of the sites I was working, I moved the Thesis navigation menu below the imaged header. However, I had a video in the Multimedia Box and the CSS Navigation Menu was dropping below the flash video. Problem! So how do we fix this?

The typical embed code of a flash video from Vimeo (or YouTube, etc) is:

[html] <object width="400" height="225">
<param name="allowfullscreen" value="true" />
<param name="allowscriptaccess" value="always" />
<param name="movie" value="http://vimeo.com/moogaloop.swf?clip_id=9188712&amp;server=vimeo.com&amp;show_title=1&amp;show_byline=1&amp;show_portrait=0&amp;color=&amp;fullscreen=1" />
<embed src="http://vimeo.com/moogaloop.swf?clip_id=9188712&amp;server=vimeo.com&amp;show_title=1&amp;show_byline=1&amp;show_portrait=0&amp;color=&amp;fullscreen=1" type="application/x-shockwave-flash" allowfullscreen="true" allowscriptaccess="always" width="400" height="225"></embed></object>[/html]

So, after the <object> tag, but before the <embed> tag, you need to add another <param> tag.

[html]<param name="wmode" value="transparent" />[/html]

And then you need to add within the <embed> tag, wmode="transparent" so that the new embed code says:

[html highlight="3,6"] <object width="400" height="225">
<param name="allowfullscreen" value="true" />
<param name="wmode" value="transparent" />
<param name="allowscriptaccess" value="always" />
<param name="movie" value="http://vimeo.com/moogaloop.swf?clip_id=9188712&amp;server=vimeo.com&amp;show_title=1&amp;show_byline=1&amp;show_portrait=0&amp;color=&amp;fullscreen=1" />
<embed src="http://vimeo.com/moogaloop.swf?clip_id=9188712&amp;server=vimeo.com&amp;show_title=1&amp;show_byline=1&amp;show_portrait=0&amp;color=&amp;fullscreen=1" type="application/x-shockwave-flash" allowfullscreen="true" allowscriptaccess="always" wmode="transparent" width="400" height="225"></embed></object>[/html]

So, that fixes most if not all of the problems (for more information on wmode, see Adobe). If it does not fix the problem, you will need to add z-index: 0; to the CSS containing the flash video and z-index: 99; (99 is an arbitrary number as any number > O can fit here) to the menu system (for further information on the z-index property). If you are using thesis, this code goes into your custom.css. Here is the code that I added (which is probably a little overboard as I believe the .custom .menu portion is not necessary):

[css].custom .image_box {z-index:1;}, .custom_box { border-style: solid; border-color: #ddd; z-index:1;}
.custom #image_box img { background: #fff; border-style: solid; border-color: #bbb; z-index:1;}
.custom .menu ul, .custom .menu ul li { z-index:99; }
.custom .menu ul ul, .custom .menu :hover ul :hover ul { z-index:99; }
.custom .menu li:hover ul, .custom .menu a:hover ul { z-index:99; }
.custom .menu { z-index:99; }
[/css]

So I have eventually landed on just this CSS code:

[css].custom .image_box {z-index:1;}, .custom_box { border-style: solid; border-color: #ddd; z-index:1;}
.custom #image_box img { background: #fff; border-style: solid; border-color: #bbb; z-index:1;}
[/css]

Written by Travis Smith · Categorized: Tutorials

Apr 06 2010

How to Call the Title(s) of Your Most Recent Blog Posts

Probably the easiest way (at least that I've found so there probably is a much easier way native to WordPress) is to get the Recent Post plugin By Nick Momrik, which allows for the PHP call

[php]<code><?php mdv_recent_posts(); ?>[/php]

in your posts or templates. It also can be expanded to include other paramaters. For example,

[php]<?php mdv_recent_posts(1, '', '<br />', true, 0, true, false); ?>[/php]

The parameters:

  • $no_posts (#)- sets the number of recent posts to display
  • $before ('HTML Code')- text to be displayed before the link to the recent post (needs single quotes around the text)
  • $after (HTML Code')- text to be displayed after the link to the recent post (needs single quotes around the text)
  • $hide_pass_post (true/false)- whether or not to display password protected posts
  • $skip_posts (#)- allows skipping of a number of posts before showing the number of posts specified with the $no_posts parameter
  • $show_excerpts (true/false) - allows the post excerpt to be output after the post title
  • $include_pages (true/false)- allows recent pages to be show with recent posts

So,

[php] <?php mdv_recent_posts($no_posts, $before, $after, $hide_pass_post, $skip_posts, $show_excerpts, $include_pages); ?> [/php]

Now, if you wish to use this in one of your blog posts or sidebar widget as I did on one of my sites, you will need another plugin to allow you to use PHP code in your Visual/HTML editor (though the Visual part will have to be disabled) or in your sidebar. Two really good ones are:

  • Exec-PHP, requires the visual editor to be turned off (though it can be worked around if you are willing to lose your code if you accidentally switch to the Visual Editor). What would make this a most excellent plugin would be if you could turn off the visual editor only on certain, specific posts and not just everyone.
  • Executable PHP Widget, which is like the Text Widget but allows PHP.

Written by Travis Smith · Categorized: Tutorials

  • « Previous Page
  • 1
  • …
  • 16
  • 17
  • 18
  • Twitter
  • Facebook
  • LinkedIn
  • Google+
  • RSS

Copyright © 2025 � WP Smith on Genesis on Genesis Framework � WordPress � Log in